GOLD EMPIRESurvive First, Then Grow

Category: Survival & Risk

  • What Is a Good Risk Reward Ratio? The Number Only Means Something in Pairs

    What Is a Good Risk Reward Ratio? The Number Only Means Something in Pairs

    Ask twenty traders what is a good risk reward ratio and you will get a number back almost instantly. One to two. One to three. Somebody will say never take anything under one to three, and say it with the confidence of a rule that has been handed down rather than tested.

    Then watch what happens to accounts run on that rule. A lot of them lose money while religiously taking only high ratio trades, and the traders running them cannot work out why, because they followed the advice exactly.

    The problem is that the question has no answer on its own. A reward to risk ratio is one half of a pair, and the half you can choose is not the half that decides whether you make money. This article works through the arithmetic, which is short, and then through what it means for how you actually trade.

    What Is a Good Risk Reward Ratio, and Why the Question Is Incomplete

    Start with what the ratio is. If your stop is a certain distance from your entry, call that distance one unit of risk, or 1R. Your target is then some multiple of that distance. A target twice as far as the stop is 1:2. Three times as far is 1:3.

    The useful thing about counting in R is that it strips out account size, lot size and the price of gold. Every trade becomes the same shape: risk one unit to try to make R units.

    Now add the missing half. Over many trades, your outcome depends on the ratio and on how often you win. Those two numbers are tied together by one formula, the win rate at which you exactly break even:

    Break-even win rate = 1 / (1 + R)

    Run it across the ratios people actually argue about:

    • At 1:0.5, you need to win 66.7 percent of the time to break even
    • At 1:1, you need 50.0 percent
    • At 1:1.5, you need 40.0 percent
    • At 1:2, you need 33.3 percent
    • At 1:3, you need 25.0 percent
    • At 1:5, you need 16.7 percent

    This is the table that gets quoted in support of wide targets, and read quickly it does look like an argument for them. At 1:5 you only need to be right one time in six. That sounds like an easier job than being right half the time.

    It is not an easier job. It is the same job, described differently, and the next section is the reason.
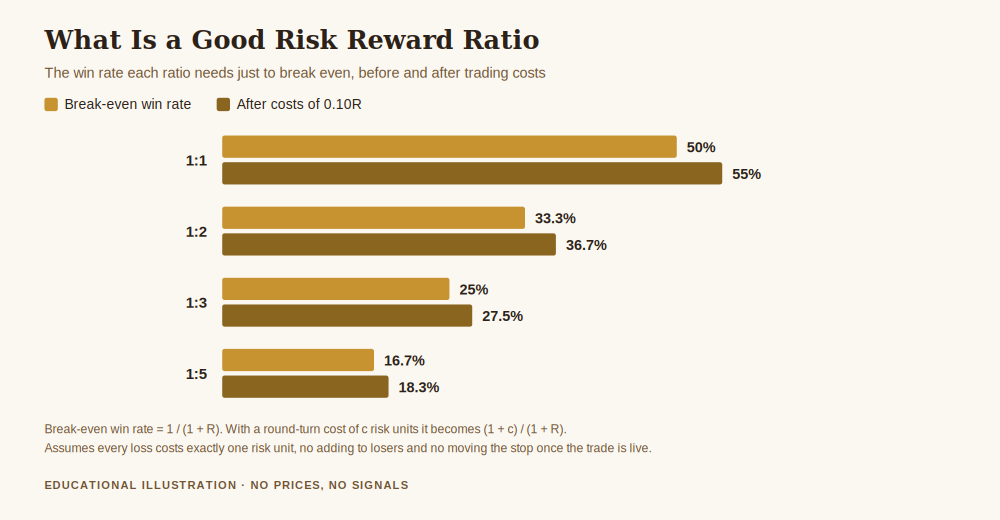
    Chart answering what is a good risk reward ratio by showing the break-even win rate each ratio needs, before and after trading costs
    What is a good risk reward ratio: each ratio comes with a win rate it must clear, and costs raise every one of those bars.

    The Part That Changes the Answer

    Here is what the table leaves out. When you move your target further away, you do not keep the same win rate. You lower it, because a more distant target is less likely to be reached before the stop is.

    How much less likely? There is a clean way to put a number on it. Assume for a moment that price has no direction at all, that it is as likely to tick up as down, which is the honest starting assumption when you have not yet demonstrated an edge. Under that assumption the probability of reaching a target R times your stop distance, before touching the stop, is a classical result:

    Probability of hitting the target first = 1 / (1 + R)

    Look carefully at that formula. It is the same formula as the break-even win rate. Identical.

    That equality is the whole answer to this article’s question. With no edge, the win rate the market hands you is exactly the win rate you need to break even, at every single ratio. Expectancy is zero at 1:1, zero at 1:3, zero at 1:5. Widening the target lowers your hit rate by precisely the amount that the bigger winners make up for. The scales balance everywhere.

    So there is no ratio that is good in itself. There is no setting of the target that manufactures an edge out of nothing. If somebody tells you a particular ratio is the reason they are profitable, they have not understood where their money is coming from.

    Then Costs Arrive, and Nothing Is Neutral Any More

    Zero expectancy is the version without costs. Real trades pay a spread, and often a commission, on the way in and the way out.

    Suppose that round turn costs you one tenth of your stop distance, a cost of 0.10R. It is a modest assumption for gold. Recompute the break-even win rates with costs included, using (1 + c) / (1 + R):

    • At 1:1, the break-even win rate rises from 50.0 to 55.0 percent
    • At 1:2, from 33.3 to 36.7 percent
    • At 1:3, from 25.0 to 27.5 percent
    • At 1:5, from 16.7 to 18.3 percent

    And if the market is still giving you the no edge hit rate, expectancy is now negative at every ratio, by the same amount: minus 0.10R per trade, whichever ratio you choose.

    That is worth stating plainly. Without an edge, every reward to risk ratio loses money at exactly the same rate, and the rate is the cost. The ratio is not where the outcome is decided. Costs and edge are.

    Free gold survival sheet

    Get the free Gold Empire survival sheet, a one-page guide to protecting your account through the kind of market this article describes. One email, no spam, unsubscribe anytime.

    Get the free survival sheet →

    So What Is the Ratio Actually For?

    It is not useless. It is just not what people think it is. Three real jobs it does:

    It sets the bar your method has to clear. Once you choose a ratio, the table tells you the win rate you must beat. That converts a vague hope into a testable claim. Trading 1:2 means claiming you can win more than 33.3 percent of the time, or 36.7 percent after costs. That claim can be checked.

    It shapes what your equity curve feels like. Wide targets mean long stretches of small losses broken by occasional large wins. Narrow targets mean frequent small wins and occasional painful losses. Same expectancy, very different experience, and the experience matters because it determines whether you can actually keep following your own method.

    It decides how much costs hurt. Look again at the cost table. At 1:1 the cost adds 5.0 points to your required win rate. At 1:5 it adds 1.7 points. That is the one genuine, structural advantage of wider targets, and it is far smaller than the folklore suggests. It is a cost efficiency, not an edge.

    The Number You Should Actually Be Hunting

    If the ratio does not decide the outcome, the win rate must, and that means the honest question is not what ratio to use but whether your win rate genuinely clears the bar your ratio sets.

    That is a harder question, because win rates are noisy. Suppose you trade 1:2, so you need to beat 33.3 percent. How many trades before you can say with reasonable confidence that your real win rate is above that line, rather than a lucky sample?

    Using a 95 percent confidence interval and requiring it to be no wider than five percentage points either side, the sample sizes come out as:

    • At 1:1, about 385 trades
    • At 1:2, about 342 trades
    • At 1:3, about 289 trades

    At two or three trades a day, that is somewhere between eight and twelve months of trading before the number means much. Which is an uncomfortable answer, and it is the true one. Most traders change their method every few weeks, on samples of thirty or forty trades, where the noise is far larger than any edge they might have.

    Ratios are attractive precisely because they are the part you can set instantly, today, by dragging a line on a chart. The win rate takes months to learn about. That asymmetry is why so much attention goes to the half that matters less.

    What to Do With This on Monday

    Pick a ratio your method can actually support and that you can tolerate sitting through, then leave it alone long enough to learn something.

    If your method takes trades at structure and gets stopped often, a wide target may leave you losing eight in a row routinely, and most people abandon a method long before its arithmetic gets a chance to work. If your method is right frequently but gives back gains, a narrow target has a real cost problem you should measure rather than assume.

    Then record the pair, not the ratio: what you targeted, and how often it actually came in. A ratio without its win rate written next to it is not a record of anything. And the cost, which almost nobody logs, belongs in that record too, because it is the one number in this article that is certain.

    Frequently Asked Questions

    What is a good risk reward ratio, in one sentence?
    There is no such thing on its own, because with no edge every ratio has the same expectancy; a ratio is only good or bad relative to the win rate your method actually achieves against it.

    Is 1:3 better than 1:1?
    Not inherently. At 1:3 you need to win 25.0 percent of the time and at 1:1 you need 50.0 percent, and under a no edge assumption those are exactly the rates you would get. The genuine difference is that costs weigh less heavily on wider targets, which is a small structural advantage rather than a reason to be profitable.

    Should I avoid ratios below 1:1?
    Not automatically, but understand the bar. At 1:0.5 you need to be right two times in three just to break even, before costs, and a small slip in your win rate does a lot of damage. Methods that work at those ratios exist, and they need a genuinely high and well measured hit rate to survive.

    Why do so many people say 1:2 is the minimum?
    It is a reasonable rule of thumb for a beginner, mostly because it discourages the habit of taking tiny profits while leaving losses to run, which is a behavioural problem rather than a mathematical one. As a claim about expectancy it does not hold up.

    Does this mean risk reward ratios do not matter?
    They matter for what they control: the bar your win rate has to clear, how your equity curve feels to sit through, and how much your costs bite. They do not create an edge, and treating them as though they do is what leaves people confused about why a disciplined 1:3 account still shrinks.

    Where did the numbers in this article come from?
    Every figure is computed from the formulas stated in the text, break-even win rate of 1/(1+R), the same expression for the no drift probability of touching the target first, and a standard sample size calculation at 95 percent confidence. The retail leverage and loss context comes from the ESMA measures linked below, which was checked live before publication. The individual investor figures are from Barber and Odean 2000, cited in full below, whose reference and DOI were verified against the Crossref record before quoting.

    Where Gold Empire Fits

    None of this is theoretical for me. The research on individual traders is not flattering, and it is worth reading rather than arguing with. Barber and Odean studied 66,465 households at a large discount broker between 1991 and 1996, and reported that the households which traded most earned an annual return of 11.4 percent while the market returned 17.9 percent. They attribute the high trading levels, and the underperformance that followed, to overconfidence. The paper is Brad M. Barber and Terrance Odean, Trading Is Hazardous to Your Wealth: The Common Stock Investment Performance of Individual Investors, The Journal of Finance, volume 55, issue 2, pages 773 to 806, published April 2000, DOI 10.1111/0022-1082.00226.

    That study is about equities rather than gold, and about turnover rather than target placement, so do not stretch it further than it goes. What it does establish is where the damage tends to come from, and it is not from choosing the wrong ratio. On the leveraged retail side, ESMA’s product intervention measures of 27 March 2018 capped retail leverage on gold at 20:1 and required negative balance protection, introduced against a backdrop of most retail CFD accounts losing money.

    Gold Empire is free to follow. Daily XAUUSD analysis with the reasoning stated before the trade rather than after it, on Telegram, and a free survival sheet for anyone who wants the capital protection material in one place. There is an optional Kit for people who want the whole method. No profit promises, and nothing here is a signal service.

    If you want the rest of this thread: risk management in gold trading is the pillar this article sits under, how much to risk per trade covers the other half of the sizing decision, and position sizing for gold turns both into an order you can actually place. More about who writes this is on the author page.

    About the author. Matthew writes Gold Empire. He spends most of his time on the unglamorous half of this business, the part concerned with still being here next year, and he has a particular impatience with rules that sound authoritative and have never been checked. Nothing in this article is a recommendation to trade, and no entry, stop or target discussed should be treated as a signal.

    Disclaimer: This article is general educational content about reward to risk ratios and trade expectancy. It is not financial advice, not investment advice and not a recommendation to buy, sell or use any product, venue or firm. Trading leveraged products carries a substantial risk of loss and most retail accounts lose money. All figures are illustrative calculations from the stated assumptions, not predictions, and not claims about any past or future performance.


  • What Happens if an Order Is Partially Filled, and Why Your Risk Is Now Wrong

    What Happens if an Order Is Partially Filled, and Why Your Risk Is Now Wrong

    A trader wrote to me in July with a question he was slightly embarrassed to ask. He had placed an order for a size he had worked out carefully, the platform showed him in the trade, and the position tab said something smaller than what he had asked for. He wanted to know whether he had made a mistake typing the number in.

    He had not. He had been partially filled, and the reason the question is worth a full article is that almost nobody explains the consequence. What happens if an order is partially filled is not really a question about order mechanics. It is a question about whether the risk you calculated before the trade is still the risk you are carrying after it, and for most people the honest answer is no.

    The mechanics take one paragraph. The consequence takes the rest of this article, because the consequence is where accounts get hurt, quietly, in a way that never shows up as a single bad day.

    What Happens if an Order Is Partially Filled, in Plain Terms

    An order is an instruction to trade a certain size at a certain price or better. It is not a promise that the size exists. When you send an order for a size larger than what is available at your price, the part that can be filled is filled, and the rest either waits, expires, or is cancelled, depending on the order type and the venue.

    So you asked for a full position and you got a fraction of one. The platform is not broken. Your broker is not cheating you. There simply was not enough on the other side at the price you were willing to accept, and the part that existed came to you.

    This is a normal feature of markets rather than a fault in them. It shows up more often in three situations, and they are worth knowing because they are the situations in which people also tend to be trading larger than usual: around a scheduled release, in the minutes after one, and in the thin hours when the desks that normally quote size have gone home.

    The rule that governs how a firm has to treat your order in the United States is worth reading once, because it tells you what the firm owes you and what it does not. FINRA Rule 5310 requires that a member firm “use reasonable diligence to ascertain the best market for the subject security and buy or sell in such market so that the resultant price to the customer is as favorable as possible under prevailing market conditions.” Read that last clause again. The obligation is to the prevailing conditions, not to your intended size. And among the factors the rule lists for judging whether a firm exercised reasonable diligence is, in its own words, “the size and type of transaction.”

    Your size is a factor in the rule. It is not a guarantee in the rule. That distinction is the whole article.

    The First Consequence, Your Risk Shrinks

    Start with the harmless version, because it helps to see the arithmetic somewhere safe.

    Say the plan was to risk one percent of a ten thousand unit account, which is one hundred units, on a position of a given size with the stop a fixed distance away. That distance is the thing that turns size into risk. Size multiplied by stop distance is the money at stake.

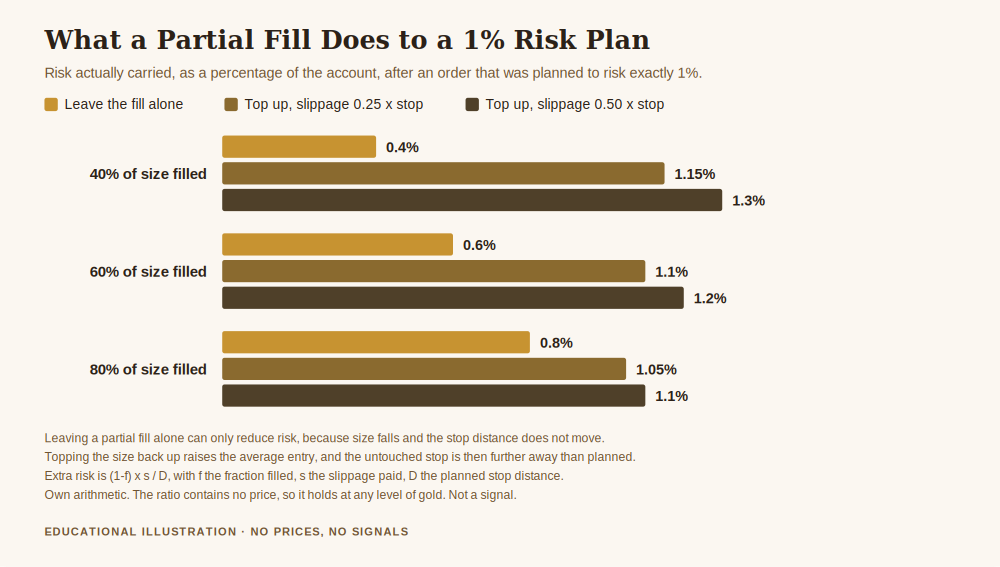
    If only forty percent of the size fills, and the stop stays exactly where the plan put it, then the money at stake is forty percent of what it was. The risk becomes zero point four zero percent of the account instead of one percent. Sixty percent filled gives zero point six zero percent. Eighty percent filled gives zero point eight zero percent.

    Nothing has gone wrong here. You are risking less than you planned. The trade can also only return a proportionally smaller amount if it works, which matters over a long series but does not threaten anything.

    The problem is that almost nobody leaves it there.

    Chart showing what happens if an order is partially filled, comparing planned risk against the realised risk when a partial fill is left alone and when it is topped up at a worse price
    What happens if an order is partially filled depends less on the fill itself than on what the trader does about it in the next thirty seconds.

    The Second Consequence, and This Is the Expensive One

    Here is what actually happens in the room. The trader sees a position smaller than intended. It looks wrong. The instinct, and it is a strong one, is to fix it, so they buy the missing portion at whatever the market is now showing, which by definition is worse than the price they originally wanted. That is why they were only partially filled in the first place.

    Now walk through what that does, without needing a single gold price.

    Call the fraction already filled f, the extra slippage paid on the remainder s, and the planned stop distance D. Your average entry moves against you by (1 minus f) multiplied by s. Your stop, meanwhile, is still sitting where the plan put it, because moving the stop felt like breaking the rules, and the trader was busy fixing the size.

    So the distance from your new average entry to your unchanged stop is now D plus (1 minus f) times s. Your risk has grown by the ratio (1 minus f) times s, divided by D.

    That expression contains no price at all. It is pure proportion, which means it is true at any level of gold, in any year, on any account size. Here is what it produces:

    • Forty percent filled, then completed at slippage equal to a quarter of your stop distance: risk is fifteen percent above plan. A one percent trade is now a one point one five percent trade.
    • Forty percent filled, completed at slippage equal to half the stop distance: risk is thirty percent above plan. The one percent trade is now one point three zero percent.
    • Sixty percent filled, completed at a quarter of the stop distance: risk is ten percent above plan.
    • Sixty percent filled, completed at half the stop distance: twenty percent above plan.

    Notice that the trader in every one of those rows believes they are risking one percent. They sized the position correctly. They placed the stop correctly. They fixed what looked like an error. And they are carrying between ten and thirty percent more risk than the plan they are so carefully following.

    How Often This Actually Happens

    A single instance of fifteen percent extra risk is not going to hurt anybody. The reason this is worth your attention is frequency, so let us put a number on that too.

    Assume that eight percent of your orders come back partially filled, and treat the orders as independent of each other. Those are assumptions, stated plainly so you can substitute your own. Under them:

    • Across five orders, the chance of at least one partial fill is thirty four point one percent. So it is roughly a one in three week.
    • Across twenty orders, the chance is eighty one point one percent. So it is most months.
    • Across two hundred orders, which is a plausible year for an active trader, you expect sixteen of them.

    Now combine that with the arithmetic above. Sixteen partial fills a year, each one topped up from a forty percent fill at slippage equal to a quarter of the stop distance, each one carrying zero point one five extra percentage points of risk, gives two point four zero percentage points of additional risk taken across the year.

    Two point four percent of the account, exposed on purpose by nobody. Not sized, not decided, not written in any plan. It is the residue of sixteen small moments of tidying up.

    I want to be careful about what that figure is and is not. It is not a loss. It is additional risk carried, and whether it costs anything depends on which of those trades went against you. But that is precisely the point of position sizing: you control the risk, and you do not get to control the outcome. Risk that arrives without a decision is the kind that eventually meets the wrong week.

    What to Do Instead

    None of this argues for never completing a position. It argues for deciding in advance, once, so that you are not deciding at the worst possible moment with a number on the screen that looks wrong.

    There are three coherent answers, and the trouble in practice is that people use a fourth, which is to react.

    Take the fill and leave it. Your risk is smaller than planned, your stop is where it belongs, and the arithmetic of the trade is intact. This is the simplest answer and it is defensible every single time. The cost is that the position is smaller than intended, which over a long enough series does affect your results.

    Complete the size and move the stop to keep the risk constant. If you want the full position, then the stop has to move so that size multiplied by distance returns to the planned number. This keeps the risk right and changes the trade, because a stop at a different distance is a different trade with different odds. That is an honest trade off, as long as you know you are making it.

    Cancel the remainder and treat the position as complete. Functionally similar to the first answer, but done deliberately, which for many people is the difference between a rule and a shrug.

    The fourth answer, which is to buy the rest at market because the position tab looked wrong, is the one that produces the two point four percentage points. It feels like discipline. It is the opposite of discipline, because the plan specified a risk and the fix silently changed it.

    One practical note that costs nothing: know what your order types actually do when they cannot be filled completely. Order handling differs between platforms and between venues, and the behaviour of a resting remainder is not the same everywhere. Finding this out on a quiet afternoon is considerably cheaper than finding it out two minutes after a release.

    Why This Belongs in the Survival File

    Most of what gets written about orders is about getting in at a better price. This is not that. A partial fill is a risk control problem wearing an execution costume, and it belongs next to position sizing rather than next to entries.

    The general shape of the thing is familiar to anyone who has been doing this a while. The account is rarely destroyed by the loss you were expecting. It is worn down by the exposures you never counted, because each one individually was too small to argue about. Fifteen percent extra on one trade is nothing. Sixteen of them, unnoticed, across a year in which you believed your risk was fixed at one percent, is a different animal.

    If you keep a record of your trades, add one column: intended size, filled size. That is the entire intervention. You cannot manage a number you never wrote down, and after a month you will know your own partial fill rate instead of using my assumed eight percent.

    Free gold survival sheet

    Get the free Gold Empire survival sheet, a one-page guide to protecting your account through the kind of market this article describes. One email, no spam, unsubscribe anytime.

    Get the free survival sheet →

    Frequently asked questions

    Is a partial fill a sign of a bad broker?
    Not by itself. It is usually a sign that the size you wanted was not available at the price you were willing to pay, which is a market condition rather than a firm behaviour. It becomes a question about the firm if it happens constantly on ordinary size in ordinary conditions, or if the remainder is handled in a way the firm never disclosed to you.

    Does a partial fill mean I paid a worse price?
    No. The part that filled, filled at your price or better. The worse price only appears if you go and buy the remainder at whatever is showing now, which is the decision this article is about.

    Should I always just accept the smaller position?
    It is the simplest and safest default, and it is never wrong on risk grounds. Whether it is right for your results depends on your strategy, and that is a decision to make once in advance rather than in the moment.

    Does this affect my stop loss automatically?
    That depends entirely on your platform, and it is worth checking rather than assuming. Some setups attach protective orders to the filled quantity, some to the requested quantity. A stop for a size you do not hold, or no stop on a size you do hold, are both worth discovering before it matters.

    Where did the numbers in this article come from?
    The wording of the best execution obligation and the list of factors including “the size and type of transaction” are quoted from FINRA Rule 5310, linked above. Every other figure was calculated for this article from assumptions written into the text: a ten thousand unit account, one percent planned risk, fill fractions of forty and sixty percent, slippage of a quarter and a half of the stop distance, a partial fill rate of eight percent, and two hundred orders a year. There are no gold prices in any of the arithmetic, because the ratios do not require one, and no entry, stop or target discussed should be treated as a signal.

    Where Gold Empire fits

    Gold Empire is free to follow. Daily XAU/USD analysis on Telegram with the level and the risk written down before the trade, losing days included. There is a free survival sheet for anyone who wants the capital protection side on one page, and an optional kit for people who want the full process. No profit is promised anywhere, because nobody can promise one.

    If you want the rest of the sizing picture, risk management in gold trading is the pillar this sits under, how to calculate lot size for gold covers the arithmetic a partial fill disturbs, how much to risk per trade covers the number that is supposed to stay fixed, and the author page explains who writes this and why. The external rule quoted above is FINRA Rule 5310.

    About the author. Matthew writes Gold Empire. He spends most of his time on the survival end of this job, the part where an account is still there in twelve months, and he has a particular interest in the small mechanical details that quietly undo a plan somebody worked hard on. Nothing here is a recommendation, and no entry, stop or target discussed should be treated as a signal.


    Disclaimer: This article is general educational content about order execution and position sizing. It is not financial advice, not legal advice, not tax advice and not a recommendation to buy, sell or use any product, venue or firm. It is a summary written for general readers and is not a statement of the law; order handling rules vary by venue, by product and by the jurisdiction and legal entity holding your account, and only a licensed professional can tell you what applies to you. The regulatory wording is quoted from the FINRA source linked in the text, which was checked and reachable at the time of writing. All other figures were calculated for this article from the assumptions stated in the text and are illustrations of proportion, not observed market data or a description of any particular firm’s fill rates. Leveraged trading in gold carries a high risk of losing money rapidly, and a majority of retail accounts lose money. Past behaviour of any market does not indicate future behaviour. No entry, stop or target discussed should be treated as a signal.


  • How to Transfer Funds From One Forex Broker to Another, and What It Really Costs

    How to Transfer Funds From One Forex Broker to Another, and What It Really Costs

    Somebody asks how to transfer funds from one forex broker to another and they are usually picturing something that does not exist. They are picturing the thing banks do, or the thing stockbrokers do, where you sign a form and your holdings appear somewhere else a few days later, untouched. In retail foreign exchange and gold there is no such pipe. The honest answer to the question is that you do not transfer anything. You close, you withdraw, you wait, and you deposit again somewhere else, and every one of those four steps costs you something.

    That sounds like a technicality. It is not. The gap between what people think they are asking for and what actually happens is where the damage lives, and most of the damage is not the money. It is the forced timing.

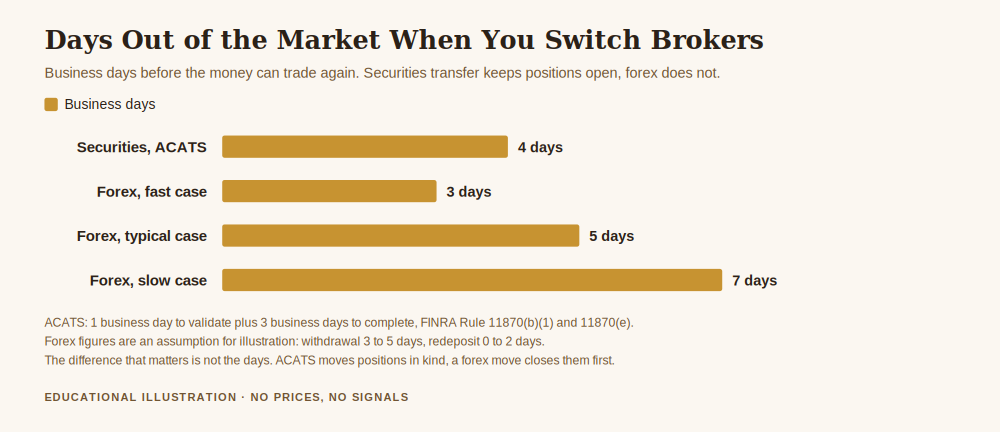
    Chart showing how to transfer funds from one forex broker to another and the days out of the market that costs, compared with a securities ACATS transfer
    The days matter less than what happens to your positions. A securities transfer moves them in kind, a forex move closes them first.

    How to Transfer Funds From One Forex Broker to Another: the Short Version

    There are four steps and no shortcuts.

    You close every open position at the old broker. You request a withdrawal, usually back to the funding method you originally deposited from. You wait for it to clear, which is the step nobody budgets for. Then you deposit into the new account and rebuild whatever you were holding, at whatever price the market is at by then.

    Notice what is missing. There is no step where your positions move. There is no step where your cost basis follows you. There is no step where an outside party guarantees the handover or gives you a timeline you can hold anyone to. You are relying entirely on the old broker to return your own money at a speed of its choosing, which is a very different relationship from the one people imagine they are in.

    The System That Does Exist, and Why It Does Not Cover You

    The picture in people’s heads is real, it just belongs to a different market. In United States securities there is a formal transfer system called ACATS, and it is governed by FINRA Rule 11870. The rule is worth reading precisely because of the contrast.

    Under 11870(b)(1), once a transfer instruction is submitted, the firm currently holding the account must, “within one business day,” either validate the instruction or take exception to it. Under 11870(e), “within three business days following the validation of a transfer instruction, the carrying member must complete the transfer of the customer’s security account assets to the receiving member.” Four business days, with named obligations on both firms, and a clearing infrastructure sitting in the middle enforcing them.

    Read the object of that sentence again: “security account assets.” Positions. The whole point of ACATS is that your holdings move in kind. You do not sell your shares to change broker. You do not realise a gain because you got tired of a platform’s spreads.

    Retail spot forex and gold contracts for difference are not securities accounts and are not inside that system. In the United States they sit under a different regulator entirely, with their own rulebook. 17 CFR 5.9, the rule that sets minimum security deposits for retail forex transactions, requires firms to collect at least “2% of the notional value of the retail forex transaction for major currency pairs and 5% of the notional value of the retail forex transaction for all other currency pairs.” Different rulebook, different regulator, different world. Nothing in it creates a transfer facility, because there is nothing standardised to transfer. Your position at a CFD broker is a bilateral contract with that specific firm. It has no existence outside the relationship, so it cannot be handed to a stranger.

    Outside the United States the details change and the conclusion does not. There is no cross broker transfer rail for retail forex anywhere I am aware of. If somebody offers you one, that is a thing to examine very carefully rather than a convenience to accept.

    What the Round Trip Actually Costs

    Let me put numbers on it, with the assumptions stated so you can disagree with them.

    Assume a 5,000 USD account risking 1% per trade, so one unit of risk is 50 USD. Assume a gold spread of 25 cents per ounce and a standard contract of 100 ounces. Closing a position pays the spread once. Reopening it at the new broker pays it again.

    At 0.05 lots that round trip is 2.50 USD, which is 0.05 of one risk unit. At 0.10 lots it is 5.00 USD, or 0.10 units. At 0.20 lots it is 10.00 USD, or 0.20 units. In other words, the direct cost of the move is a fifth of a single trade’s risk at most. That is nothing. If the trading cost of switching were the whole story, you would switch the moment you were unhappy and never think about it again.

    The cost that matters does not appear in that arithmetic. It is the three to seven business days when your money is in transit and you have no position, no ability to take one, and no control over the timing. The market does not pause. If you are flat for a week because your withdrawal is sitting in a compliance queue, you did not pay 5 USD, you paid whatever the week was worth, and you cannot know that number in advance in either direction.

    Then there is the forced realisation. Every open position gets closed on a date chosen by your administrative situation rather than by your reasoning. Winners and losers alike, crystallised because you wanted to change platform. In jurisdictions where realised gains are taxable events, you have just created a tax event for a reason that has nothing to do with the market. That is not an argument against switching. It is an argument against switching while you are holding something you would not otherwise close.

    The Order of Operations That Reduces the Damage

    Most of what goes wrong here is sequencing, and sequencing is free to fix.

    Open and fully verify the new account before you touch the old one. Complete identity verification, deposit a small amount, confirm the platform works and the instrument you trade is actually available on your account type. People close everything first, then discover the new broker wants a document they cannot produce quickly, and spend two weeks holding cash in a bank account instead of a trading account. Verification is free and reversible. Do it first.

    Withdraw a small amount from the old broker before you withdraw all of it. This is the single most useful thing in this article and it has nothing to do with transfers. A small test withdrawal tells you whether the exit works, at a stage where the answer still costs you nothing. If a firm returns 100 USD promptly and without a story, that is real information. If a small withdrawal produces delays, new document requests, a sudden bonus clawback clause or an account manager who wants to talk you out of it, you have learned something enormous while almost all of your money is still recoverable and your attention is not yet exhausted.

    Most people asking how to move brokers are already uneasy about the one they are with. That unease is worth testing directly and cheaply rather than by betting the whole balance on a single large withdrawal request.

    Withdraw to the method you deposited from. Anti money laundering rules at most regulated firms push funds back down the path they came in, often proportionally across several methods if you funded several ways. Expecting a card deposit to come back as a bank wire to a different name is how withdrawals get stuck. This is also why funding an account tidily in the first place pays off later, which is the argument made in the best way to fund a brokerage account.

    Close positions on your own schedule, not in one click. If you are carrying several positions, closing them all simultaneously at whatever hour you happened to make the decision is the worst version of this. Spread it out. Close them at moments you would have been willing to close them anyway.

    Export your records before the account closes. Trade history, statements, deposit and withdrawal confirmations. Access to a closed account is not guaranteed and support for a former client is not a priority. You will want these for tax purposes and for your own review long after the platform login stops working.

    Leave the old account empty, then close it deliberately. Dormant balances attract inactivity fees at many firms, which quietly eat a small balance over a year or two until there is nothing left to argue about.

    Free gold survival sheet

    Get the free Gold Empire survival sheet, a one page guide to protecting your account in the situations where your money is somebody else’s to release. One email, no spam, unsubscribe anytime.

    Get the free survival sheet →

    Frequently Asked Questions

    Can I move an open position from one forex broker to another? No. The position is a contract with that specific firm, not a holding in a registry, so there is nothing to deliver to a third party. This is the practical difference between a CFD account and a securities account, and it is why ACATS has an equivalent for shares and no equivalent here.

    How long does the whole move take? The honest answer is that it depends on the firm you are leaving, which is exactly the problem. The withdrawal is the variable step and it is controlled by the party with the least incentive to hurry. How long a forex withdrawal takes goes through what drives that timing.

    Should I keep the old account open as a backup? Keeping a verified, empty, fee free account open is reasonable and occasionally useful. Keeping a funded one open because you have not decided is how people end up with money spread across three firms they no longer trust. Decide, then move all of it.

    The new broker offered to cover my transfer costs. Is that a good sign? Treat it as a marketing cost, not a favour, and read what accepting it obliges you to do. Deposit bonuses and cost rebates frequently come with volume conditions that restrict withdrawals until you have traded a certain amount. An incentive that makes your money harder to remove is the opposite of what you were trying to achieve by switching.

    My broker will not let me withdraw. Is there a transfer route around that? No, and looking for one is a distraction from what has happened. If a regulated firm is refusing a legitimate withdrawal, the route is the firm’s formal complaints procedure and then the regulator or ombudsman that licenses that specific legal entity, named in your client agreement. Recovery services that approach you offering to retrieve the funds for an upfront fee are, in the ordinary case, a second loss aimed at people who have just taken a first one.

    Where Gold Empire fits

    Gold Empire is free to follow. Daily gold analysis with the reasoning written out, losing days included, plus an optional Kit for people who want the method in one place. There is no promise of profit here, because nobody honest can make one.

    Whether you can get your money out is a survival question before it is a preference question, which is why this sits under risk management in gold trading. How long a forex withdrawal takes covers the step that decides the timeline, the best way to fund a brokerage account covers the deposit side that determines how the exit will work, and how to choose a broker for gold trading is the decision you are making if you have got this far. If you have not opened the new account yet, how to open a gold trading account is the step to do first.

    About the author

    Matthew has spent a long time around gold, most of it learning things the slow way, and now writes them down so other people can learn them the fast way. He is more interested in the mechanics that quietly drain accounts than in the setups that fill timelines. Nothing in this article is personal advice, and no entry, stop or target discussed should be treated as a signal.


    This article is educational content about account administration, transfer mechanics and withdrawal procedures. It is not investment advice, not legal or tax advice, not a recommendation of any broker, and not a solicitation to trade. The transfer timings and obligations described are quoted from FINRA Rule 11870, which governs United States securities accounts and does not apply to retail forex or contracts for difference; the retail forex security deposit minimums are quoted from 17 CFR 5.9. Both are United States rules, summarised here rather than reproduced in full, and amended from time to time. Rules, withdrawal procedures and investor protections differ substantially by jurisdiction and by firm, and you should read your own client agreement and check your own regulator. General guidance on transferring a brokerage account is published by the SEC at investor.gov. Every cost figure here is my own arithmetic under the assumptions written out in the text, using illustrative spread values rather than any firm’s actual pricing, and no gold price level is quoted anywhere in this article. Trading gold carries a real risk of losing money, including more than you deposit in some account types. Nothing accounts for your personal circumstances, and no entry, stop or target discussed should be treated as a signal. If you are unsure, speak to someone properly qualified in your own jurisdiction before you risk anything.


  • How to Set Up a Trailing Stop Loss Without Being Shaken Out

    How to Set Up a Trailing Stop Loss Without Being Shaken Out

    Almost everybody who looks up how to set up a trailing stop loss is really asking one of two questions. Either they keep watching a good trade turn into a flat one and want the profit locked in, or they keep getting knocked out of trades that go on to work without them. The trailing stop is offered as the answer to both. It cannot be, and the reason it cannot be is arithmetic rather than opinion.

    A trailing stop is a single setting that trades one of those problems for the other. Tighten it and you stop giving profit back, at the cost of being removed from more trades early. Loosen it and you stay in, at the cost of handing back more of every peak you reach. There is no distance that does both, and below is the simulation that shows exactly what each setting costs, along with the mechanics of the order itself and the one thing about it that catches people out at the worst possible moment.

    How to Set Up a Trailing Stop Loss: The Mechanics First

    The order has three moving parts, and getting them straight removes most of the confusion.

    The trailing distance

    This is how far behind the price the stop sits. Platforms express it as points, pips, a money amount, a percentage, or a multiple of a volatility measure. They are all the same idea measured in different clothes. Everything in this article is expressed in a neutral unit rather than points, because the right distance on one instrument is meaningless on another.

    The ratchet

    This is the part that makes it a trailing stop rather than an ordinary one. On a long position, when the price makes a new high, the stop moves up to stay the chosen distance below that new high. When the price falls back, the stop does not follow it down. It stays where the last high left it. The stop is therefore a record of the best price the trade ever saw, minus the distance you chose.

    The trigger

    How often the platform checks. Some trail on every tick, some on the close of each bar, and some, importantly, only trail while your terminal is running. That last one is a real trap on a desktop platform: close the laptop and the ratchet stops ratcheting, while the ordinary stop it left behind stays exactly where it was. If the order lives on the broker’s server it keeps working. If it lives in your terminal it does not. This is worth checking before it matters rather than after.

    What the Order Promises, and What It Does Not

    Here is the part that surprises people at the exact moment they can least afford a surprise, and it is not a broker quirk. It is what a stop order is.

    The United States Securities and Exchange Commission puts it plainly on its investor education site: a stop order is an order to buy or sell once the price reaches a specified level, and when the stop price is reached, a stop order becomes a market order. The CFTC’s own glossary says the same thing in its own words: a stop order becomes a market order when a particular price level is reached.

    Read that carefully, because a trailing stop is a stop order with a moving trigger. It does not promise you the price it is sitting at. It promises to try, at market, once that level trades. In a calm market the difference is small. In a fast one, or across a gap, the fill can be some distance away, and the trailing stop that looked like a guarantee of a locked in gain turns out to have been a request.

    That distinction is the whole reason this article measures the cost of slippage separately below, rather than assuming it away.

    The Trade-Off Nobody Puts a Number On

    So how much does each setting actually cost? I ran the question rather than argued about it, and the assumptions are all on the table so you can disagree with any of them.

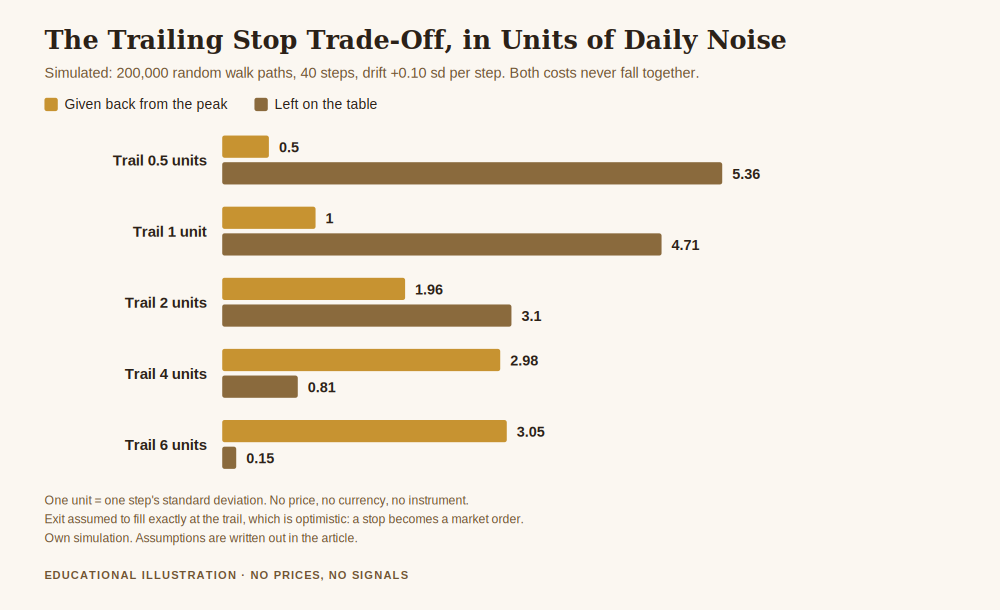
    The simulation: 200,000 independent price paths, each 40 steps long. Each step adds a random shock with a standard deviation of one unit, plus a small positive drift of 0.10 units per step, so the trade has a genuine edge rather than being a coin flip. A long position opens at the start. The trailing stop sits a fixed distance below the highest price reached so far and ratchets up only. The trade closes when that level is touched, or at the end of the window if it never is. The exit is assumed to fill exactly at the stop, which is deliberately optimistic given what the SEC and the CFTC just told us. No spread, no commission, no financing.

    Two costs get measured. Given back from the peak is how much of the best price the trade ever reached is handed back before the exit. Left on the table is how much further the trade would have gone in the remaining window after being stopped out.

    Chart for how to set up a trailing stop loss, showing that as the trailing distance widens the amount given back from the peak rises while the amount left on the table falls
    How to set up a trailing stop loss is a choice between two costs: the wider the trail, the more you give back from the peak and the less you leave on the table.

    At a trail of half a unit, the position gave back 0.50 units from its peak and left 5.36 units on the table. It was stopped out on essentially every single path, with a median holding time of three steps.

    At a trail of four units, it gave back 2.98 units and left only 0.81 on the table. It was stopped out on 64.86 percent of paths, with a median holding time of 29 steps.

    Widening the trail from half a unit to four cut what was left on the table by 84.9 percent and multiplied what was given back from the peak by 5.96 times. Every intermediate setting sits somewhere along that same line. The two costs never fall together at any distance, which is the entire point.

    Notice what this does to the two complaints at the top of the article. The trader who keeps giving profit back and the trader who keeps getting knocked out early are standing at opposite ends of one curve. Moving to fix one problem moves you toward the other. Nobody sells it that way, and the settings menu certainly does not say it.

    Why a Tight Trail Pays the Slippage Bill More Often

    Now put the SEC’s point back in. Run the identical simulation, but assume the stop fills a quarter of a unit worse than the level it triggered at, which is a modest assumption for a market order in a hurry.

    At a trail of half a unit, the average outcome fell by 25.03 percent. At a trail of four units, it fell by 4.70 percent. At six units, by 1.27 percent.

    The same slippage, five times more damaging at the tight setting. The reason is not that a tight stop slips harder. It is that a tight stop triggers more often. At half a unit the stop fired on 100 percent of paths, so the bill was paid every time. At four units it fired on 64.86 percent, and at six units on 32.58 percent, so the bill was paid on a third of them.

    Slippage is charged per stop out, not per trade. Any setting that increases how often you get stopped out is also increasing how many times you pay a cost that the settings menu does not show you. That is worth knowing before deciding that tighter equals safer.

    Free gold survival sheet

    Get the free Gold Empire survival sheet, a one page guide to protecting your account through exactly the kind of decision this article describes. One email, no spam, unsubscribe anytime.

    Get the free survival sheet →

    The Thing a Trailing Stop Cannot Do

    One more result from the same simulation, and it is the one worth remembering longest.

    Run the whole thing again with the drift removed, so the price is a pure coin flip with no edge at all. Every trailing distance still produces an average exit above zero, from 0.658 units at the tightest setting down to 0.296 at the widest, and every one of them still ends below the entry price on more than half of all paths, between 51.10 and 57.95 percent of the time.

    Look at what that is saying. On a random walk, no trailing distance turns the exercise into a winning one, and the tightest setting is not safer than the widest, it is simply a different mix of small gains and frequent stop outs. The trailing stop rearranged the outcomes. It did not create an edge, because it cannot. It has no information about the future; it only knows where the price has already been.

    This matters because of how the order gets sold and how it gets used. It is an exit management tool, and the thing it manages is the shape of the distribution, not the middle of it. A losing method with a well tuned trailing stop is still a losing method with a tidier equity curve. The decision about whether the trade should exist at all was made before this setting was ever touched.

    Reading the Curve for Your Own Situation

    None of the numbers above tell you a distance to use, and any article that hands you one is guessing at your circumstances. What the curve does give you is a way to reason about your own choice honestly.

    If your own record shows trades that reached a good level and came back, you are at the wide end of the curve and the give back is the cost you are paying. If it shows repeated knock outs before the move continued, you are at the tight end, paying in missed continuation and in slippage bills.

    The mistake is not picking the wrong end. It is picking a distance without knowing which cost you chose, then changing it after every trade that went badly, which turns a policy into a series of reactions and guarantees you pay both. Decide once, write it down, and let a run of trades produce enough evidence to judge it. Everything on that chart is an average over 200,000 paths; your own next five trades are not a sample of anything.

    Frequently Asked Questions

    What is the best trailing stop distance?
    There is no single answer, and the simulation above shows why: every distance trades one cost for another, so the best one depends on which cost you would rather carry and on the volatility of what you are trading. Anyone quoting a universal number has answered a different question from the one you asked.

    Does a trailing stop guarantee I keep my profit?
    No. Both the SEC and the CFTC define a stop order as one that becomes a market order when its level is reached, so the fill is whatever the market gives at that moment. It can be worse than the level, sometimes considerably worse in fast conditions or across a weekend gap.

    Does a trailing stop ever move backwards?
    No, and that is the defining feature. On a long position it moves up as new highs are made and stays put when the price falls back. That one way ratchet is what makes it hand back exactly the trailing distance from the peak, no more and no less, before it triggers.

    Does a trailing stop work when my platform is closed?
    It depends entirely on where the order lives. Server side orders keep trailing whatever your terminal is doing. Orders that the desktop platform manages locally stop ratcheting when the platform closes, leaving an ordinary stop at whatever level it last reached. Check which kind yours is before you need to know.

    Is a tighter trailing stop safer?
    Not in the way people usually mean. It reduces how much you give back from a peak, and it increases how often you are stopped out, which increases how many times you pay slippage. In the simulation, a quarter unit of slippage cost 25.03 percent of the outcome at the tightest setting and 4.70 percent at a wide one.

    Where did the numbers in this article come from?
    The definitions of a stop order are quoted from the SEC’s investor education site and the CFTC’s glossary, both linked above. Every figure about give back, leaving money on the table, stop out rates and slippage comes from my own simulation of 200,000 paths under the assumptions written out in the text. It is a model, not a measurement of gold or of any real account, and no price level appears anywhere in this article.

    Where Gold Empire fits

    Gold Empire is free to follow. The daily work is posted on Telegram with the reasoning attached, losing days included, and there is a free survival sheet for anyone who wants the protective side written down in one page. There is an optional Kit for people who want more, and there is no promise of a return here, because nobody honest can make one.

    How you leave a trade is a survival question before it is a technical one, which is why this sits under risk management in gold trading. If you are still deciding where the first stop goes, where to place a stop loss on XAUUSD comes before this article, what a break even stop is covers the simplest version of moving a stop once, and how to manage a gold trade after you enter is the wider habit this setting belongs inside.

    About the author

    Matthew has spent a long time around gold, most of it learning things the slow way, and now writes them down so other people can learn them the fast way. He is more interested in the mechanics that quietly drain accounts than in the setups that fill timelines. Nothing in this article is personal advice, and no entry, stop or target discussed should be treated as a signal.


    This article is educational content about how a trailing stop order behaves. It is not investment advice, not a recommendation of any broker, platform, order type or setting, and not a solicitation to trade. The definitions of a stop order are quoted from the SEC’s investor education material on order types and the CFTC glossary; order handling differs between firms and jurisdictions, so confirm how your own provider implements these orders. Every other figure here comes from my own simulation of a random walk with the assumptions stated in the text, expressed in abstract units rather than any currency or instrument. It is a model chosen to illustrate a trade-off, not a measurement of gold, not a backtest, and not a claim about anyone’s results, mine included. No trailing distance is recommended anywhere in this article and no gold price level is quoted. Trading gold carries a real risk of losing money, including more than you deposit in some account types. Nothing accounts for your personal circumstances, and no entry, stop or target discussed should be treated as a signal. If you are unsure, speak to someone properly qualified in your own jurisdiction before you risk anything.


  • How to Calculate Average Risk Reward Ratio Without Fooling Yourself

    How to Calculate Average Risk Reward Ratio Without Fooling Yourself

    Most traders learn how to calculate average risk reward ratio the same way: open the journal, look down the column where each winning trade is recorded as a multiple of what it risked, and take the mean. It is one line in a spreadsheet and it feels like measurement. The trouble is that this particular average answers a question nobody asked, and on a journal where the size of the bet changed over time it can read forty percent higher than the figure the account actually earned.

    This is not a rounding quibble. It is the difference between a book that looks like it is working and a balance that is going down. Below is the arithmetic on a forty trade sample, the two formulas that disagree, and the reason the disagreement is always in the flattering direction.

    How to Calculate Average Risk Reward Ratio: The Two Formulas

    There are two defensible ways to average a risk reward ratio across a series of trades, and they are not interchangeable. Which one is correct depends on what you intend to do with the answer.

    Method one, the mean of the ratio column

    Take every winning trade, express it as a multiple of the money that trade risked, and average those multiples. A trade that risked 100 units and made 210 is 2.10. A trade that risked 400 and made 340 is 0.85. Add the multiples, divide by the number of wins.

    This tells you the average outcome of a trade, treating every trade as one equal observation. It is the right tool for a narrow question: when this setup works, how far does it usually run relative to what I was risking? That is a question about the setup, not about the account.

    Method two, weighted by the money at risk

    Add up every unit you won. Add up every unit you lost. Divide the average win in money by the average loss in money. No ratio column, no per trade multiples, just two totals and a division.

    This tells you the average outcome of your capital. It is the figure that combines with your win rate to say whether the book makes money, and it is the only one of the two that has any claim on the word “average” when you are talking about an account rather than a setup.

    On a journal where you risked exactly the same amount on every single trade, the two methods return the same number and none of this matters. On any other journal they come apart, and they come apart in a predictable direction.

    The Forty Trade Sample Where They Disagree

    Here is a deliberately ordinary sample. Forty closed trades. Eighteen wins, twenty two losses, a 45.0 percent win rate. Every loss is a full stop out, so a loss costs exactly the money that trade risked. The only thing that changes across the sample is size: the first twenty trades risked 100 units each, and the last twenty risked 400 units each, which is what happens when someone has a decent run and starts sizing up.

    The units are abstract on purpose. No gold price appears anywhere in this article, and none is needed, because every figure here is a ratio.

    Chart for how to calculate average risk reward ratio, showing the mean of the ratio column reading 1.64 to 1 against the same forty trades weighted by money at 1.16 to 1
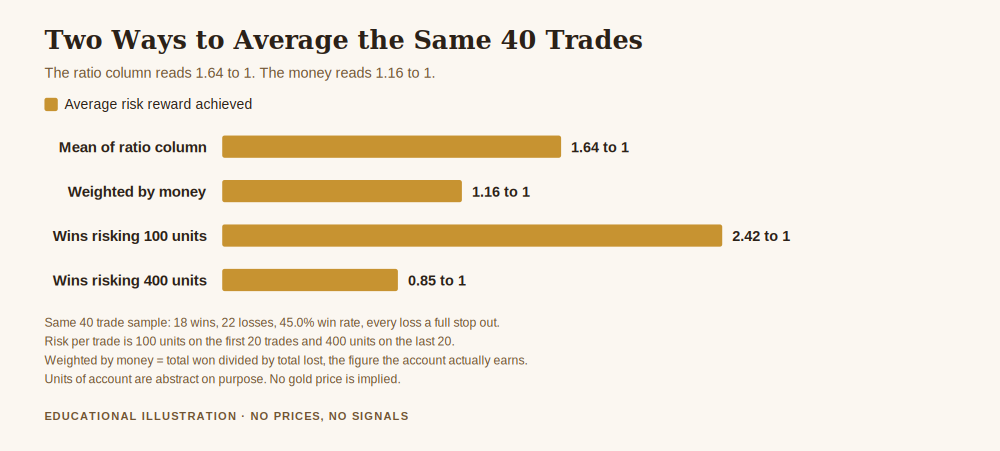
    How to calculate average risk reward ratio two ways on one sample: the ratio column reads 1.64 to 1, the money reads 1.16 to 1.

    Method one returns 1.64 to 1. Method two returns 1.16 to 1. Same forty trades, same journal, no arithmetic errors in either. The ratio column overstates the account’s real ratio by 40.5 percent.

    The median of that ratio column is 1.25, well below its own mean of 1.64, which is the first clue that something in the distribution is dragging the average around.

    Why the Gap Opens, and Why It Always Flatters

    Split the wins by size and the mechanism is obvious. The wins taken while risking 100 units averaged 2.42 to 1. The wins taken while risking 400 units averaged 0.85 to 1.

    The unweighted mean treats one of those small, excellent trades as exactly one vote, and one of those large, mediocre trades as exactly one vote. The account does not. The account experiences the large trades four times as loudly. When the good ratios happen to sit on the small bets and the poor ratios sit on the large ones, averaging the column without weighting quietly discards the fact that most of the money was riding on the worse outcomes.

    The direction is not random, and this is the part worth internalising. Sizing tends to increase after wins and stay small during the tentative early phase of a system. Ratios tend to be best when a position is small enough to leave alone and worst when it is large enough to feel, because a large position gets managed, trimmed and closed early. Those two tendencies point the same way. The bets that get the best ratios are systematically the ones carrying the least money, so the unweighted average is not merely noisy, it is biased upward on most real journals.

    A second, smaller distortion sits on top. A ratio column has a floor of zero and no ceiling. One trade that ran to 4.10 pulls the mean up much harder than a 0.50 pulls it down. That is why the median sits so far below the mean here, and it is why a single outlier month can make a mediocre year read well.

    The Number That Decides Whether the Ratio Is Enough

    An average risk reward ratio is not a verdict on its own. It only becomes one when you put it next to the win rate, because the pair together decide whether the book breaks even.

    The break even win rate for a given ratio is one divided by one plus the ratio. At the honest 1.16 to 1, this sample needs a 46.2 percent win rate simply to stand still. It produced 45.0 percent. Those 1.2 percentage points are the whole story: over the forty trades the sample lost 260 units against 10,000 units of money risked, which is 2.6 percent of everything put at risk.

    Now run the same test using the flattering figure. At 1.64 to 1, the break even win rate is 37.9 percent, and a 45.0 percent win rate looks like a comfortable margin. The ratio column does not just overstate a statistic. It converts a losing system into an apparently healthy one, and it does so without any dishonesty on the trader’s part.

    This is worth holding next to what regulators observe across the retail population. When ESMA introduced its product intervention measures on 27 March 2018, it stated that 74 to 89 percent of retail accounts typically lose money, with average losses per client running from 1,600 to 29,000 euros. Nobody in that group set out to lose. A measurement that reads high by forty percent is one of the quieter ways an account can stay in that statistic while its owner believes the numbers are fine.

    Free gold survival sheet

    Get the free Gold Empire survival sheet, a one page guide to protecting your account from the measurements that quietly mislead you, including the two column check described here. One email, no spam, unsubscribe anytime.

    Get the free survival sheet →

    How to Run This on Your Own Journal

    You do not need new software. You need four totals and about ten minutes.

    Total the money you risked on every closed trade. Not the position size, the money that would have been gone had the stop been hit. If your journal does not record this, that is the first thing to fix, because every figure below depends on it and no ratio means anything without it.

    Total the money won on winners, and the money lost on losers. Two sums, in currency, ignoring ratios entirely at this stage.

    Divide the average win by the average loss. That is your real average risk reward ratio. Write it next to whatever your ratio column has been telling you. On a book where size has changed, expect the two to differ, and expect the column to be the higher of the pair.

    Compare it against your win rate. One divided by one plus the ratio gives the win rate you need to break even. If your actual win rate is below that number, the system is losing money regardless of how any individual trade felt, and no amount of ratio improvement fixes it while the sizing pattern stays as it is.

    Then do one more thing, because it is where the diagnosis usually lives. Split the wins by position size and average each group separately. If the small trades carry the good ratios and the large ones carry the poor ratios, as they do in the sample above, the problem is not your entries. It is that the trades you believe in most are the ones you manage worst, and that is a sizing and discipline problem rather than an analysis problem. How much to risk per trade and position sizing for gold are where that gets decided, and deciding it before entry is the only version of the decision that works.

    Frequently Asked Questions

    How do I calculate average risk reward ratio in one line?
    Divide your average winning trade in money by your average losing trade in money, using every closed trade. Do not average the per trade ratio column unless you risked an identical amount on every trade, because when risk varies that average describes your setups rather than your account.

    Which of the two averages is the correct one?
    Both are correct for different questions. Weighted by money is correct for judging whether the account makes money, which is almost always what people mean. The unweighted ratio column is correct for judging how far a particular setup tends to run, which is useful when you are comparing setups against each other at a constant size.

    Why is my ratio column higher than my real ratio?
    Almost always because your position size has not been constant, and your better ratios landed on your smaller positions. The unweighted mean gives every trade an equal vote while your account gives every trade a vote proportional to the money on it. A long right tail in the wins widens the gap further, which is why the median of a ratio column usually sits well below its mean.

    What win rate does my average risk reward ratio need?
    One divided by one plus the ratio, before costs. A 1.16 to 1 ratio needs 46.2 percent, a 2 to 1 needs 33.3 percent, a 3 to 1 needs 25 percent. Spread and any overnight financing push all of those requirements higher, so treat the result as a floor rather than a target.

    How many trades before this measurement means anything?
    More than most people have. Forty trades, as in the sample here, is enough to demonstrate the arithmetic and nowhere near enough to establish that a given ratio is a stable property of a system. Treat any figure from a short sample as a description of what has happened rather than a forecast of what will.

    Where did the numbers in this article come from?
    The forty trade sample is constructed, not measured, and it is stated as such throughout. Every figure computed from it is my own arithmetic on the assumptions written into the text: full stop outs on losses, 100 units of risk on the first twenty trades, 400 on the last twenty. The retail loss figures are ESMA’s own, published with its 27 March 2018 measures and linked above. None of it describes any real account, mine or anyone else’s.

    Where Gold Empire fits

    Gold Empire is free to follow. Daily gold analysis with the reasoning attached, losing days included, and an optional Kit for people who want the survival side written down in one place. There is no promise of a return here, because nobody honest can make one.

    Measuring a book correctly is a survival topic rather than a technical one, which is why it sits under risk management in gold trading. If the ratio you are measuring is being set by where you put the stop, where to place a stop loss on XAUUSD comes before this one, and why consistency beats being right covers the habit that makes the weighted and unweighted figures converge in the first place.

    About the author

    Matthew has spent a long time around gold, most of it learning things the slow way, and now writes them down so other people can learn them the fast way. He is more interested in the mechanics that quietly drain accounts than in the setups that fill timelines. Nothing in this article is personal advice, and no entry, stop or target discussed should be treated as a signal.


    This article is educational content about the arithmetic of measuring a trading record. It is not investment advice, not a recommendation of any broker, platform or account type, and not a solicitation to trade. The forty trade sample is a constructed illustration chosen to demonstrate a method, not a measurement of any real account, and it should not be read as a claim about results, mine or anyone else’s. The retail loss figures are published by the European Securities and Markets Authority with its product intervention measures of 27 March 2018; the rules described there apply to particular jurisdictions and account types and may have changed since, so check what applies to you. Further general warnings for retail participants are published by the CFTC in its customer advisories. Every other figure here is my own arithmetic on the stated assumptions. Trading gold carries a real risk of losing money, including more than you deposit in some account types. No gold price level is quoted anywhere in this article. Nothing accounts for your personal circumstances, and no entry, stop or target discussed should be treated as a signal. If you are unsure, speak to someone properly qualified in your own jurisdiction before you risk anything.


  • Gold vs Bitcoin Volatility, Measured Over One Year

    Gold vs Bitcoin Volatility, Measured Over One Year

    Every few months somebody tells me bitcoin is digital gold, and every few months I find myself giving the same unsatisfying answer: that is not a claim, it is a slogan, and slogans cannot be checked. What can be checked is gold vs bitcoin volatility, because volatility is a measurement rather than an opinion. You take the two price series, you compute how much they move, and the number comes out the same whoever runs it. So I ran it, over the twelve months ending yesterday, and I am going to show you the arithmetic rather than the conclusion.

    The reason this matters is not that it settles an argument at a dinner table. It is that if you already trade gold and you are thinking about putting part of the same account into bitcoin, the difference in volatility decides how large that position is allowed to be before it is carrying more risk than the gold position it sits next to. Most people size the second instrument the way they sized the first, and that is where the trouble starts.

    What Gold vs Bitcoin Volatility Actually Measures

    Volatility measures dispersion, not direction. It tells you how widely the daily returns are scattered around their own average. It does not tell you whether an asset went up or down over the period, it does not tell you whether it is a good thing to own, and it says nothing whatsoever about what happens next.

    That last point is worth sitting with, because volatility is the single most misread number in this business. A high volatility asset is not one that is falling. A low volatility asset is not one that is safe. Volatility describes the width of the distribution of daily moves, and an asset can be extremely volatile on the way up. Bitcoin’s largest single day in my sample was a gain, not a loss.

    The standard way to express it is annualised standard deviation of logarithmic returns. Take each day’s move as the natural log of today’s close divided by yesterday’s, compute the standard deviation of that series, then scale it up to a yearly figure. The output is a percentage, and it is roughly interpretable as the range within which about two thirds of annual outcomes would fall if returns were normally distributed, which they are not. Nobody should lean hard on that interpretation. Use it as a ruler for comparing two things, which is exactly what I am about to do with it.

    The Numbers, and Exactly How I Got Them

    Here is the method, in enough detail that you could reproduce it and get my numbers to the decimal place. That is the point of writing it down.

    For gold I used the LBMA Gold Price, afternoon auction, in dollars per troy ounce. That is the London benchmark, it is published by the London Bullion Market Association, and it is the closest thing gold has to an official daily close. For bitcoin I used the daily dollar close from the CoinGecko market chart endpoint, which is a public price aggregator.

    The window is the twelve months from 22 August 2025 to 21 August 2026 inclusive. Bitcoin trades every day of the year and gold does not, so I used only the dates present in both series. That left 251 common dates and therefore 250 daily returns for each asset. Both assets are measured on an identical set of days, which is the part people usually get wrong: comparing a 365 day series against a 252 day series inflates the crypto number for a purely calendrical reason and tells you nothing.

    The results, over those 250 shared observations:

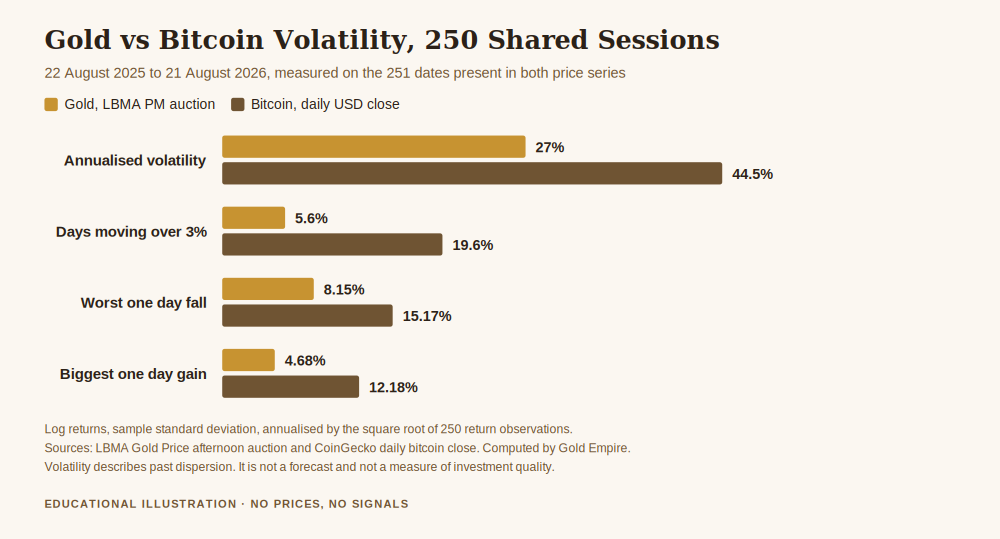
    • Gold, daily standard deviation: 1.710%. Annualised: 27.0%.
    • Bitcoin, daily standard deviation: 2.812%. Annualised: 44.5%.
    • Ratio of bitcoin volatility to gold volatility: 1.64 times.

    So over this particular year, bitcoin was about two thirds again as volatile as gold. Not ten times. Not a hundred times. If you were expecting a bigger gap, hold that thought, because the gap is bigger than 1.64 in the way that actually costs money, and the average is hiding it.

    Chart comparing gold vs bitcoin volatility over 250 shared trading days, showing annualised volatility and the share of days moving more than three percent
    Gold vs bitcoin volatility over 250 shared sessions: the annualised averages sit closer together than the frequency of large days does.

    Why the 1.64 Ratio Is the Least Interesting Number Here

    Standard deviation is an average, and averages are calm by construction. They smooth over precisely the days that end accounts. So I counted the large days directly instead.

    Over the same 250 sessions, gold moved more than 3% in a single day on 14 occasions, which is 5.6% of days. Bitcoin did it on 49 occasions, which is 19.6% of days. That is a ratio of about 3.5 to 1, more than double the 1.64 you get from comparing the standard deviations. Roughly speaking, gold handed you a 3% day about once a month, and bitcoin handed you one about once a week.

    The single worst days tell the same story. Gold’s largest one day fall in the sample was 8.15%, on 30 January 2026. Bitcoin’s was 15.17%, on 6 February 2026. Bitcoin’s largest single day gain, 12.18%, landed on the final day of the sample.

    This is the thing to take away. The volatility ratio says the two assets are within shouting distance of each other. The frequency of large moves says they are not. When people are surprised by a crypto position, it is almost never because the annualised number surprised them. It is because a Tuesday did.

    What This Does to Position Size

    Now the practical half, and this is arithmetic rather than advice.

    Suppose you want a bitcoin position to carry the same amount of risk, in currency terms, as a gold position you are already comfortable with. Risk in currency terms is roughly position value multiplied by volatility. If bitcoin is 1.64 times as volatile, then to hold the risk constant, the bitcoin position has to be smaller by the inverse of that ratio. One divided by 1.64 is 0.61. The bitcoin position would be about 61% of the size of the gold position.

    Read that the other way round, because that is the direction the mistake runs. If you take a position size that felt reasonable in gold and you apply the same size to bitcoin, you have not taken the same risk. You have taken about 1.64 times the risk, silently, without deciding to. Nothing on your screen tells you this. The platform shows you a position, not a risk contribution.

    And because the tails are 3.5 times more frequent rather than 1.64, the sizing correction that keeps your average day comfortable still leaves you meeting a large day far more often than you are used to. Sizing for the standard deviation is the floor of the work, not the ceiling.

    I am deliberately not telling you what either position should be. That number depends on the size of your account, what else is in it, and what you can absorb without changing how you behave, and I do not know any of those things about you. What I am telling you is that the two positions should not be the same size, and that most people’s are.

    One Honest Caveat About Gold’s Own Number

    Gold at 27% annualised volatility is high by gold’s own historical standards. Gold has spent long stretches of its history nearer half that. This particular twelve month window contained an 8.15% single day fall in a metal that frequently goes years without one, so the number you are reading reflects an unusually active period for gold rather than a permanent property of it.

    That cuts both ways for the comparison. If gold reverts to a quieter regime and bitcoin does not, the ratio widens. If both quieten, it may not move much at all. A twelve month window is a snapshot, and I chose it because it is recent and because both series are complete across it, not because it is representative of anything. Run the same code over a different year and you will get a different pair of numbers. That is not a flaw in the method, it is the honest situation, and anyone quoting you a single volatility ratio without naming a window is selling you something.

    What This Article Does Not Say

    It does not say which asset is better. Volatility is not quality. A more volatile instrument is not a worse one, and a less volatile instrument is not a safer one, particularly since the lower volatility asset here is the one that can be held without counterparty risk and the higher volatility one is not.

    It does not say bitcoin is or is not digital gold. That claim is about correlation, monetary properties and behaviour in a crisis, none of which I measured here. I measured dispersion. Dispersion is one narrow slice of a much larger argument, and I would rather give you the slice I can defend than an opinion I cannot.

    It does not predict anything. Every figure in this article is a description of 250 days that have already happened. Volatility clusters and changes regime, and the next 250 days are under no obligation to resemble the last.

    And there is not a single price level anywhere in this article, in either asset, deliberately. Everything is a percentage or a ratio, so that it remains true whatever the screen says on the day you read it.

    Free gold survival sheet

    Get the free Gold Empire survival sheet, a one page guide to the account habits that decide whether a volatile month is survivable, including how to size a second instrument next to the one you already hold. One email, no spam, unsubscribe anytime.

    Get the free survival sheet →

    Frequently Asked Questions

    What is the gold vs bitcoin volatility ratio right now?
    Over the 250 shared trading days ending 21 August 2026, bitcoin’s annualised volatility was 44.5% against gold’s 27.0%, a ratio of 1.64 to 1. That ratio is specific to that window and will be different over a different one, so treat it as a measurement with a date attached rather than a constant.

    Does higher volatility mean bitcoin is riskier?
    It means the daily moves are more widely dispersed, which is one component of risk and not the whole of it. Risk also includes the chance of permanent loss, custody and counterparty exposure, liquidity in a stressed market and your own behaviour under pressure, none of which standard deviation measures.

    Why measure both assets on the same days?
    Because bitcoin trades roughly 365 days a year and the gold benchmark fixes only on London business days. Annualising a 365 observation series and a 252 observation series with the same formula creates a difference that comes from the calendar rather than from the market, which is why this comparison uses only the 251 dates present in both.

    How do I size a bitcoin position next to a gold position?
    The arithmetic in this article says that matching risk rather than matching size means the more volatile position is proportionally smaller, about 61% in this sample. The actual figures depend on your account and your tolerance, and this is a description of the calculation and not a recommendation of any position size.

    Is annualised volatility the same as the volatility shown on my platform?
    Often not. Platforms and indicators use varying lookback lengths, sometimes intraday data, sometimes simple ranges rather than standard deviation of log returns. Two tools can both be correct and disagree, so check what a number is measuring before comparing it to anything.

    Where Gold Empire Fits

    Gold Empire is free to follow. Daily gold analysis with the reasoning attached, losing days included, plus an optional Kit for people who want the method written down. Nothing here promises a profit and nothing here ever will.

    Survival first, as always. Volatility is only half of the position size question and risk management in gold trading is where the other half lives. If the arithmetic above was the interesting part, how much to risk per trade and position sizing for gold take it further, and what is leverage in gold trading explains the mechanism that turns a 3% day into something much larger on your balance. For the question of which gold instrument you are actually holding in the first place, gold CFD versus physical gold covers the ground this article assumes.

    About the author. Matthew writes Gold Empire. He is interested in the unglamorous half of this business, cost, size, frequency and the arithmetic of staying solvent, on the view that most accounts are lost to ordinary errors repeated patiently rather than to one dramatic mistake.

    Disclaimer: This article is general educational content about measuring price volatility and the arithmetic of position sizing. It is not financial advice, not a recommendation to buy, sell or hold gold, bitcoin or any other asset, and not a suggestion to open any particular position. Trading gold, cryptocurrency, CFDs and leveraged products carries a high risk of losing money rapidly. No entry, stop or target discussed should be treated as a signal. All volatility figures were computed by me from two public sources: the LBMA Gold Price afternoon auction in US dollars, and daily US dollar closes for bitcoin from the CoinGecko market chart endpoint. Method: natural log returns between consecutive closes, sample standard deviation with one degree of freedom, annualised by the square root of the number of return observations, computed over the 251 dates from 22 August 2025 to 21 August 2026 that appear in both series, giving 250 returns per asset. Only dates present in both series were used so that the two assets are measured over identical observation dates. Because each series carries one observation per day, moves within a session are not captured and real intraday extremes were larger than any figure quoted here. Volatility is a description of past dispersion, not a forecast, and it does not measure custody risk, counterparty risk, liquidity risk or the risk of permanent loss. The 61% figure is the inverse of the measured volatility ratio and is an illustration of equal risk arithmetic, not a recommended position size. No price level for gold or bitcoin is quoted anywhere in this article and no trading results are represented. Past behaviour of any price series is not a prediction.


  • How to Stop Losing Money Day Trading Gold: The Arithmetic of Frequency

    How to Stop Losing Money Day Trading Gold: The Arithmetic of Frequency

    Most people who ask how to stop losing money day trading are asking about the wrong half of the problem. They are looking for the entry that stops failing, the indicator that stops lying, the session that finally behaves. I have spent a long time in that search and I want to save you some of it, because the arithmetic says the leak is usually somewhere else entirely, somewhere much duller, and somewhere you can measure this afternoon without learning anything new about charts.

    The leak is frequency. Not whether you are right, but how many times a day you pay for the privilege of finding out.

    The Cost Nobody Puts in the Journal

    Every time you open and close a position you pay a round turn. The spread, and where it applies, a commission. It is a small number. That is exactly why it survives scrutiny: it is too small to feel, and it does not appear in your journal as a loss. It appears as a slightly worse fill, a slightly earlier stop, a winner that came up a little short of where you thought it would land.

    A single round turn will never be the reason an account fails. Two thousand of them can be, and a day trader taking five round turns a day reaches two thousand inside two years without doing anything unusual.

    To see the size of it, the cost has to be converted into a unit that means something. Percentages of position value are meaningless on their own, because they depend on how big the position is. The unit that matters is R, which is simply the money you put at risk on one trade. If you risk the same amount on every trade, then R is your ruler, and every cost, every win and every loss can be measured with it.

    Turning a spread into a number you can compare

    Here is the conversion, with both assumptions stated so you can substitute your own.

    Assumption one: a round turn costs 0.02% of position value. That is a stand in for a typical retail dealing cost on gold. Yours may be better or worse, and your broker’s own contract specification is the place to check rather than any article.

    Assumption two: your stop sits 0.24% away. That figure is not invented. Using the published LBMA gold benchmark over the ten years from 2016 to 2025, there were 2,506 fixings and therefore 2,505 session to session comparisons. The median absolute move across those sessions was 0.48%. A day trader is not working with the whole daily move, so I have taken half of it as a stop distance, which is generous to the day trader rather than harsh.

    Divide the cost by the stop distance and you have the answer in R. It comes to 0.083R per round turn, or a little over eight percent of everything you risk on a trade, handed over before the market has done anything at all.

    Put differently, one round turn consumes 4.16% of a median session’s entire movement. You are buying back that ground before you can call yourself even.

    How to Stop Losing Money Day Trading Means Reading This Table First

    Multiply 0.083R by the number of round turns you take, across a 250 day trading year, and the small number stops being small.

    How to stop losing money day trading, chart of the annual cost in R at one, three, five and ten round turns a day
    The cost of frequency for a gold day trader, measured in R, which is the risk taken on a single trade.

    One round turn a day costs 20.8R across the year. Three a day costs 62.5R. Five a day costs 104.1R. Ten a day costs 208.2R.

    Look at the last line for a moment. A trader risking one percent of the account per trade, taking ten round turns a day, is paying out more than two hundred times their per trade risk over a year purely in dealing costs. The strategy has to overcome that before it produces anything. Not beat the market, not outsmart anyone. Simply get back to nil.

    This is the number that separates people who wonder why a decent method keeps going nowhere from people who have already checked.

    The Coin Flip Test

    Arithmetic in a table can feel abstract, so I ran the situation directly. Take a trader with no skill whatsoever, a pure coin flip, winning half the time at one R and losing half the time at one R, and charge them 0.083R per round turn. Nothing else. No bad discipline, no revenge trading, no oversized position. Just the cost.

    Across forty thousand simulated years:

    • At one round turn a day, that trader finishes the year down 91.0% of the time, with a median result of 20.8R lost.
    • At five round turns a day, the trader finishes down 99.8% of the time, with a median result of 104.1R lost.

    The coin is fair. The market has taken nothing from them. Frequency alone converted a level game into a near certainty of loss, and it did so faster at higher frequency, which is the part worth sitting with. Trading more often did not give the coin flipper more chances to get lucky in any way that helped. It gave the cost more chances to compound.

    This is also why the answer to how to stop losing money day trading is so rarely a new technique. A new technique has to be good enough to clear 0.083R per trade before it is worth anything, and most of what gets sold as a technique has never been measured against that bar at all.

    What the Research Has Been Saying for Twenty Years

    None of this is a private discovery. The relationship between how often people trade and how they do has been one of the more consistent findings in the academic literature.

    Barber and Odean’s Trading Is Hazardous to Your Wealth, published in The Journal of Finance in 2000, examined 66,465 households holding accounts at a discount broker between 1991 and 1996. The households that traded most earned an annual return of 11.4% while the market returned 17.9%, and the average household earned 16.4% while turning over 75% of its portfolio each year.

    Those are stock market figures, not gold, and the instrument is genuinely different. The mechanism is not. Turnover was the variable that separated the groups, and the most active were furthest behind, which is the same shape as the table above arrived at from pure arithmetic in a different market.

    A later study by Barber, Lee, Liu and Odean, The Cross-Section of Speculator Skill: Evidence from Day Trading, published in the Journal of Financial Markets in 2014, looked specifically at day traders and at whether persistent skill can be identified among them. I would rather you opened it than took my summary on trust, and both papers are linked so you can.

    What This Argument Is Not

    I want to be careful here, because this line of reasoning gets overstated in both directions.

    It is not an argument that day trading cannot work. The table is a cost, not a verdict. A method producing more than 0.083R per trade on average, after everything, is ahead of the cost. Such methods exist.

    It is not an argument that you should trade once a day rather than five times. If your genuine edge only appears five times a day, taking it five times a day is correct, and cutting to one would cut the edge along with the cost.

    What it is: an argument that you cannot know which of those applies to you until you have measured the cost against the edge. Almost nobody has done that measurement, which is why almost everybody in this position reaches for a new indicator instead. The indicator is cheaper to try. It is also, on this evidence, the less likely place for the problem to be.

    Four Things to Measure This Week

    None of this requires new software or a new method. It requires four numbers you can find in your existing statement.

    Your real round turn cost. Not the advertised spread, the actual one. Take a sample of closed trades, compare the price you expected against the price you received on both sides, and include commission. Advertised costs are quoted under favourable conditions and day traders frequently operate outside them.

    Your average stop distance. In percentage terms, across your recent trades. This is the denominator that turns your cost into R, and it is the number most people have never calculated.

    Your round turns per day. Count them for a fortnight rather than estimating. Estimates run low, consistently and in one direction, because the trades you regret are the ones you forget.

    Your gross expectancy per trade, in R, before costs. If that number is below your cost per round turn, the method is not yet viable at any frequency, and more activity makes it worse rather than better. That is unwelcome to discover and considerably cheaper than discovering it slowly.

    Those four numbers will tell you more about your account than any amount of further chart study, and they will tell you in an afternoon. If you want the wider framework they sit inside, that is risk management in gold trading, and the sizing half of it is in how much to risk per trade.

    Free gold survival sheet

    Get the free Gold Empire survival sheet, a one page guide to sizing a gold position and counting what each trade actually costs you before the market moves at all. One email, no spam, unsubscribe anytime.

    Get the free survival sheet →

    Frequently asked questions

    Is trading less often really the answer to how to stop losing money day trading?

    Trading less often is the answer when your cost per round turn is larger than your average edge per trade, which is a condition you can test rather than guess. If your edge comfortably exceeds the cost, frequency is working for you and cutting it would cost you money. The instruction is to measure, not to slow down for its own sake.

    Where did the 0.083R figure come from?

    It is a division, not a measurement of your account. A round turn cost of 0.02% of position value divided by a stop distance of 0.24% gives 0.083R. The stop distance is half the median absolute daily move of the LBMA gold benchmark over 2016 to 2025, which was 0.48% across 2,505 session comparisons. Substitute your own cost and your own stop distance and you will get your own number, which is the one that matters.

    Does a bigger stop fix the problem?

    It reduces cost measured in R, because the denominator grows, and that is real. It does not create an edge, and it changes what a losing trade does to the account, so it cannot be evaluated on the cost line alone. Widening a stop to improve one ratio while worsening your risk elsewhere is not an improvement, it is a transfer.

    My broker advertises very low spreads on gold. Does this still apply?

    The arithmetic applies at any cost level, with a different result. Halve the cost assumption and you halve every figure in the chart, which is a genuine improvement and still leaves ten round turns a day costing over a hundred R a year. Also check what the advertised figure covers, since headline spreads are usually quoted under calm conditions and widen when the market is busy, which is precisely when day traders are active.

    Does the coin flip simulation prove day trading loses money?

    No, and it is not intended to. It isolates one variable. It shows what cost alone does to a trader with no edge and no behavioural problems, so that the size of the cost is visible without anything else obscuring it. A trader with a real edge is a different case, and the same arithmetic tells them how large that edge needs to be.

    Why measure in R rather than in money?

    Because R is comparable across account sizes, across time and between people, and money is not. A cost of a few units of currency means nothing without knowing the position behind it. A cost of 0.083R tells you immediately that you have surrendered eight percent of your risk before the trade begins, and that statement stays true whatever the size of your account.

    What is the single most common mistake here?

    Counting only the trades that hit a stop as costs. The cost is charged on every trade, including the winners and including the ones closed flat after two minutes because it did not look right. Those flat trades feel free. In the arithmetic they cost exactly as much as the others.

    Where This Leaves You

    The honest answer to the question is that most day trading accounts are not destroyed by a dramatic event. They are worn down by an ordinary one, applied often, and recorded nowhere. The good news in that is real: a cost you can measure is a cost you can decide about, and you do not need to be right more often to reduce it. You need to count.

    Work out what a round turn costs you in R. Multiply it by how often you trade. Then decide whether the method you are running clears that bar. Whatever the answer, you will be making a decision with a number in front of you, which puts you ahead of where most of this argument gets conducted.

    Where Gold Empire Fits

    Gold Empire is a free Telegram channel where I post gold analysis with the reasoning stated before the move rather than after it, losing days included. There is nothing to buy in order to follow along, and an optional Kit if you want more structure later. I publish no profit claims and I do not rank brokers for payment.

    The free survival sheet is the one page version of the counting discipline described here. If costs are the part you want to go deeper on, what is the spread in gold trading covers the mechanics, and how to stop overtrading and revenge trading deals with the behavioural side of the same frequency problem.

    About the author. Matthew writes Gold Empire. He is interested in the unglamorous half of this business, cost, size, frequency and the arithmetic of staying solvent, on the view that most accounts are lost to ordinary errors repeated patiently rather than to any single dramatic trade.

    Disclaimer: This article is general educational content about dealing costs and trading frequency. It is not financial advice and it is not a recommendation of any broker, product or method. Trading gold, CFDs and leveraged products carries a high risk of losing money rapidly. No entry, stop or target discussed should be treated as a signal. The cost of 0.02% of position value and the stop distance of 0.24% are stated assumptions used as worked examples, not settings to copy, and you should substitute figures from your own broker and your own records. The median daily movement figure is computed from the published LBMA daily gold benchmark over 2016 to 2025 and the source is linked so you can check it. The simulation describes a model, not any real account, and no real trading results are represented anywhere in this article. The academic papers are linked rather than summarised in figures so that you can read them directly. No gold price is quoted anywhere in this article.


  • How to Trade Gold and Silver Without Doubling Your Risk by Accident

    How to Trade Gold and Silver Without Doubling Your Risk by Accident

    People arrive at how to trade gold and silver expecting one answer to cover both, because the two metals sit next to each other on every platform, move at roughly the same times, and respond to roughly the same headlines. That last part is true enough to be dangerous. They do respond to the same things. They just respond by a very different amount, and almost nobody adjusts for it.

    I want to put a number on that difference rather than describe it, because the number is the whole lesson. Everything below is computed from the published London benchmark prices for both metals, and the method is stated so you can repeat it. As always here, no entry, stop or target discussed should be treated as a signal.

    The measurement, before the opinions

    I took the LBMA daily benchmark prices for gold and for silver, kept only the days where both metals were priced, and compared each benchmark with the one before it. The window is the ten complete calendar years from 2016 to 2025. That leaves 2,506 benchmark days and 2,505 day-on-day comparisons for each metal.

    Here is what came out.

    Chart showing how to trade gold and silver, the difference in daily movement between the two metals from 2016 to 2025
    How to trade gold and silver starts here: silver is not a cheaper version of gold, it is a faster one.

    On an average day, gold’s benchmark moved 0.66 percent and silver’s moved 1.22 percent. Silver travelled 1.84 times as far as gold on a typical day across a decade.

    Measured the other way, as annualised volatility, gold came out at 14.6 percent and silver at 27.4 percent, a ratio of 1.87. Two different methods, the same answer: silver moves roughly twice as much.

    The tails are worse than the average suggests. Gold moved 2 percent or more on 4.4 percent of days. Silver did it on 18.2 percent of days. A 2 percent day is unusual in gold and ordinary in silver, happening about once a week. Push to 3 percent and gold managed it on 0.9 percent of days against silver’s 7.2 percent, which is eight times as often.

    Why this is the thing that empties accounts

    Nobody blows up because they misunderstood the industrial demand picture for silver. They blow up because of what happens next, and it happens quietly.

    You have traded gold for a while. You have settled on a position size that feels survivable, because you have watched what a bad day does to it and you can live with that. Then you open silver, and you use the same size, because it is the size you use.

    You have just increased your risk by about 84 percent without making a decision to do so. Not by taking a worse trade, not by ignoring a rule, but by carrying a habit across a border where the habit no longer applies. Your bad day in silver is now roughly twice the bad day you calibrated for, and the once-a-week 2 percent move that gold taught you to treat as an event is, in silver, just Tuesday.

    This is why I treat it as a sizing problem rather than an analysis problem. If you want to carry the same amount of daily risk in silver as you carry in gold, the arithmetic says size at about 54 percent of your gold position, because 1 divided by 1.84 is 0.54. Slightly more than half. That is not a rule I am handing you, it is the consequence of the measurement above, and you should redo it for your own window before you rely on it.

    How to trade gold and silver as two instruments, not one

    The practical answer to how to trade gold and silver is that you do not trade them the same way, and the differences are worth stating plainly.

    Silver has a second job

    Gold’s demand is dominated by things that do not care much about the economic cycle: jewellery, investment, and central bank reserves. Silver does all of that and is also an industrial input, used in electronics, solar panels and brazing alloys. That gives silver a second demand channel gold does not have.

    The consequence for you is not a forecast, it is a warning about correlation. There are stretches when the two metals move together and stretches when they part company, because industrial demand is pulling on one of them and not the other. Two positions that look like diversification during the first stretch turn out to be one position with extra steps during the second.

    The market is smaller, so the moves are bigger

    Silver’s market is a fraction of gold’s in value terms. The same size of order lands harder in a smaller market, which is most of why the volatility numbers above look the way they do. This is also why silver’s spread tends to be wider relative to its price, and wider still when things get busy. Your costs go up in exactly the conditions where you are most likely to want to trade.

    The ratio moves too, and it is not a signal

    People discover the gold to silver ratio, which is simply how many ounces of silver one ounce of gold is worth, and quickly start treating it as a timing tool. Across the same 2016 to 2025 window that ratio had a low of 58.1, a high of 123.5 in March 2020, and a median of 81.3. From low to high it swung by 113 percent.

    Read that again, because it is the opposite of what the ratio is usually sold as. A measure that can more than double is not a stable anchor you can lean on. It is a relationship that spends years away from its own median. Anyone using it as a reason to expect reversion needs to be able to fund the wait, and the wait has historically been measured in years.

    What actually changes in your routine

    If you decide to trade both, a small number of things need to change. None of them is exciting.

    Size each metal separately. One position size for your account is a habit that only works when you trade one instrument. The moment you add a second, the size has to be derived from that instrument’s own movement, not inherited from the first.

    Count them as one exposure when they move together. During the stretches when the two metals track each other closely, holding both is closer to holding a single larger position than to holding two independent ones. Your total risk is not the sum of two comfortable numbers, it is something larger, and the account only finds out on a bad day.

    Recalculate what a normal day looks like. If your stop placement is informed by how far the instrument usually travels, and it should be, then it has to be recalculated per instrument. A distance that sits safely outside gold’s ordinary noise sits comfortably inside silver’s.

    Expect the cost per trade to be higher. Wider spreads on the more volatile instrument mean the same trading frequency costs you more in silver than in gold. If your edge is thin, this alone can be the difference. The mechanics of that are covered in what the spread actually costs you.

    The honest options

    There are three defensible ways to approach this and one indefensible one.

    Trade gold only. Perfectly respectable, and what I would suggest for most people for longer than they want to hear. You get the smaller of the two swings while you are learning, and you are learning on the instrument where mistakes cost less.

    Trade both, sized separately. This works, and it is more work than it sounds. You maintain two sets of numbers, you track them as one exposure when they converge, and you accept the higher cost on the silver side.

    Trade silver only. Also defensible if you have deliberately chosen the faster instrument with your eyes open and sized for it. Some people prefer it. The requirement is that the choice was made rather than drifted into.

    Trade both at the same size. This is the indefensible one, and it is by far the most common. It is not a strategy. It is an unexamined assumption that costs about 84 percent extra risk on the silver side, and it stays invisible until the week it is not.

    Where the risk really lives

    I have spent this article on movement rather than on where either metal is heading, and that is deliberate. Direction is the part everyone studies and the part nobody can promise. How far a thing moves on an ordinary day is knowable, measurable from public data, and almost entirely ignored, which is a strange allocation of attention given that the second one is what determines whether you are still trading next year.

    The full version of that argument is in risk management in gold trading, and if you have not yet worked out your own position size from first principles, how much to risk per trade is the piece to read before this one.

    Free gold survival sheet

    Get the free Gold Empire survival sheet, a one-page guide to sizing a position so that an ordinary bad day stays an ordinary bad day, whichever metal you are trading. One email, no spam, unsubscribe anytime.

    Get the free survival sheet →

    Frequently asked questions

    Is silver just a cheaper way to trade gold?

    No, and this is the single most expensive misunderstanding in the pair. A lower price per ounce is not a lower risk per position. What determines your risk is how far the price travels multiplied by how much of it you hold, and silver travels roughly 1.84 times as far as gold on an ordinary day. Same money at risk, more movement against it.

    Should a beginner start with gold or silver?

    Gold, in my view, and not because silver is disreputable. Learning happens through mistakes, and mistakes on the instrument that moves half as far cost roughly half as much. There is no advantage to serving your apprenticeship on the faster instrument, and there is an obvious disadvantage.

    Does the gold to silver ratio predict anything?

    Not reliably enough to build a position on. Over 2016 to 2025 it ranged from 58.1 to 123.5, a swing of 113 percent, and spent long periods far from its median of 81.3. It describes a relationship rather than forecasting one. Treating a measure that can double as a stable anchor is how people end up funding a very long wait.

    Can I hold gold and silver at the same time to diversify?

    You can hold both, but be careful about calling it diversification. There are long stretches where the two move closely together, and during those stretches two positions behave much like one larger position. Diversification that disappears in exactly the conditions you wanted it for is not doing the job you hired it for.

    Why is silver’s spread usually wider?

    Because silver’s market is considerably smaller than gold’s in value terms, so there is less depth to absorb orders, and because it is more volatile, which makes quoting it riskier for whoever is on the other side. Both effects push the same way, and both get worse in fast conditions.

    Do I need to redo these numbers myself?

    You should, and it takes an afternoon. My window was 2016 to 2025 and the answer would come out somewhat differently over a different decade. The source is public and linked above. A number you have recomputed yourself is one you will actually act on, and one you will know the limits of.

    Where this leaves you

    The difference between gold and silver is not a matter of taste, and it is not a matter of which one has the better story this year. It is a measurable difference of roughly a factor of two in how far the price travels, and it has been stable enough across a decade that you can plan around it.

    What makes it dangerous is precisely that it is boring. It does not feel like a risk, because nothing about opening a second instrument feels like a decision. You just use the size you use. That is the whole failure, and it is invisible right up until a Tuesday in silver does what a rare day in gold used to do.

    Size each one for what it actually is. That is most of the answer, and the rest is patience.

    Where Gold Empire fits

    Gold Empire is a free Telegram channel where I post gold analysis with the reasoning stated before the move rather than after it, losing days included. There is nothing to buy in order to follow along, and an optional Kit if you want more structure later. I publish no profit claims, for reasons this article should make obvious.

    The free survival sheet is the one page version of the sizing discipline described above.

    About the author. Matthew writes Gold Empire. He is interested in the unglamorous half of this business, cost, size, frequency and the arithmetic of staying solvent, on the view that most accounts are lost to ordinary errors repeated patiently rather than to any single dramatic trade.

    Disclaimer: This article is general educational content about volatility and position sizing across two instruments. It is not financial advice and it is not a recommendation to buy or sell anything, including either metal. Trading gold, silver, CFDs and leveraged products carries a high risk of losing money rapidly. No entry, stop or target discussed should be treated as a signal. The 54 percent sizing figure is the arithmetic consequence of the measured volatility ratio, offered as a worked example rather than as a rule to copy. All volatility, day count and ratio figures are computed from the published LBMA daily benchmark prices for gold and silver over 2016 to 2025, using the method stated in the article, and the source is linked so you can check it. No price levels are quoted anywhere in this article.


  • How to Become a Good Trader When There Is No Shortcut

    How to Become a Good Trader When There Is No Shortcut

    Every few months someone asks me how to become a good trader, and they are almost always asking a different question underneath: how long until this works. I understand the impulse. I want to answer it with arithmetic rather than encouragement, because the arithmetic is more useful and, in the end, kinder.

    There is no shortcut. That sentence gets said so often it has stopped meaning anything, so below I have worked out what it actually costs in trades and in time. No entry, stop or target discussed should be treated as a signal.

    The number that decides everything else

    Here is a question almost nobody asks before they start: how many trades does it take before your results can tell you anything at all?

    This is a statistics problem with a clean answer. Suppose you have a genuine edge and win 55 percent of the time. I want to be plain that 55 percent is an arbitrary figure chosen to demonstrate arithmetic, not a target and not a claim about what anyone achieves. To show that a 55 percent rate is genuinely different from a coin flip, at 95 percent confidence with an 80 percent chance of detecting it, you need 617 trades.

    Put that on a calendar. The LBMA Gold Price benchmark published on an average of 250.6 days a year across 2016 to 2025. At one trade per trading day, 617 trades is about two and a half years.

    Chart showing how to become a good trader, the number of trades needed before results separate skill from luck
    How to become a good trader, in sample size: the smaller your edge, the longer before your own results can prove it exists.

    And it gets worse as the edge gets smaller, which is the part that surprises people. A 52 percent edge, still a real edge, needs 3,863 trades to demonstrate. That is over fifteen years at one a day. A 60 percent edge, which would be exceptional, still needs 153.

    Sit with what that means. For most of your first two years, your account balance is not evidence. It is noise with a number attached. Anyone who tells you after three profitable months that they have found something has measured nothing at all, and the honest version of that sentence is that they do not yet know.

    What that changes about the plan

    If results cannot tell you whether you are good for a couple of years, then the plan cannot be built on results. It has to be built on two things you can control immediately: your process and how long you can survive while the process matures.

    That is the whole reason the sequence below is in this order. It is not a syllabus. It is a survival schedule.

    Step 1: Fund the learning, not just the account

    The most common way this ends is not a blown account. It is a person who needed the money and had to stop.

    Before the trading money, you want ordinary living expenses covered from ordinary income, and a cash reserve that has nothing to do with the market. This sounds like personal finance advice rather than trading advice, and that is exactly the point. A trader with rent due behaves differently from a trader without, and the difference shows up in every decision, always in the same direction: bigger, sooner, and held longer than the plan said.

    If losing the trading capital entirely would change how you live, the amount is wrong. That is not caution, it is a precondition. How much money you need to start trading gold goes through the sizing side of this.

    Step 2: Learn the rules of the game before the tactics

    Most beginners start with entries because entries are what the internet sells. The rules of the instrument come first, and they are dull, finite and learnable in a few evenings.

    What is the contract size. What does one point cost you. What is the spread and when does it widen. What happens to a position held overnight, and over a weekend. What is your broker’s margin call level and what exactly do they do when you reach it. When are the scheduled events that move this market.

    None of that is a strategy. All of it is the arithmetic your strategy will be running inside, and not knowing it is how people discover their real position size by accident. This is also the cheapest knowledge in the whole endeavour, because it is written down and free.

    Step 3: Understand the market before the indicators

    An indicator is a formula applied to past prices. It cannot know anything the prices did not already contain, and every one of them is a rearrangement of the same data you are already looking at.

    That does not make them useless, but it does mean that learning twelve indicators is not twelve pieces of knowledge. It is one piece of knowledge, twelve times. Time spent on why the market moves, who is on the other side, and when liquidity is thin, compounds. Time spent memorising settings does not.

    I set out the constraints I actually use in 5 price action rules every trader needs to know, and the structural view in what market structure is in gold trading.

    Step 4: Decide what would prove you wrong, in writing

    Before real money, write down what you are doing and what result would make you stop doing it. Not a feeling, a threshold you set while calm.

    The reason this step exists is that after six hundred trades you will want to know whether your approach worked, and you will only be able to answer that if you defined it beforehand. A method you revised quietly every month is a method you can never test, and you will have spent two years learning nothing you can rely on.

    Step 5: Risk the smallest amount that still feels real

    Paper trading teaches the mechanics and almost nothing about the pressure. Very small real money teaches both. The sizing framework sits in risk management for gold trading, and where the exit belongs in where to place a stop loss on XAU/USD.

    The goal of the first year is not profit. It is to arrive at trade six hundred with your capital and your composure both intact, because that is the first moment your record means anything.

    What a realistic first year looks like

    People imagine the first year as a learning curve that bends upward. In practice it is closer to three separate jobs done in sequence, and mixing them up is what makes it take three years instead.

    Months one to three, learn the machine. Contract sizes, costs, margin, the calendar, the platform. Take positions so small that the outcome is genuinely uninteresting, because the objective is to make ordering, sizing and exiting boring before anything is at stake. Nobody’s results from this period mean anything, and that is fine, because you are testing whether you can operate the equipment.

    Months four to nine, hold one method still. This is the hardest part and the one most people skip. Pick an approach, write it down, and do not change it, because every change resets your count back to zero. You will be tempted to adjust after a bad fortnight. The arithmetic above is the reason not to: a bad fortnight inside 617 trades is not information.

    Months ten onward, read what you wrote. Now you have enough trades to look for patterns in your own behaviour, which is different from patterns in the market. Which rule do you break, and when. Almost everyone finds it is the same rule, broken under the same conditions.

    Notice what is missing from that year: profit. Not because it cannot happen, but because targeting it in year one reliably produces the behaviour that ends year one early.

    How to become a good trader without paying for the lesson twice

    There is a base rate worth knowing before any of this. When the European Securities and Markets Authority introduced its measures on contracts for difference, it reported that national regulators across EU jurisdictions found 74 to 89 percent of retail accounts typically lose money, with average losses per client between 1,600 and 29,000 euros.

    That band is wide because different regulators measured different populations, and I would rather quote it honestly than sharpen it. What it establishes is that this is a difficult activity where most participants lose, and that the losses are not trivial sums.

    Read alongside the 617 figure, it produces the most useful sentence I know on this subject. Most people who lose do not lose because they were wrong about the market. They lose because they ran out of money or patience before their sample size arrived. Those are two different failures and only one of them is about skill.

    Which is why the sequence above front loads everything that extends your runway and delays everything that shortens it. Not because caution is virtuous, but because the arithmetic requires you to still be here in year three.

    Free gold survival sheet

    Get the free Gold Empire survival sheet, a one page guide to the constraints that keep an account alive long enough for the learning to pay off. One email, no spam, unsubscribe anytime.

    Get the free survival sheet →

    Frequently asked questions

    How long does it really take to become a good trader?

    On the arithmetic above, roughly two to three years before your own results can distinguish a modest edge from luck, assuming you trade about once a trading day and keep your method stable enough to measure. People who change approach every few months never reach that point at all, because each change resets the count.

    Can I speed it up by trading more often?

    You can reach 617 trades faster, but you will pay the spread 617 times sooner and you will be taking positions on days that offered nothing, which tends to lower the edge you are trying to measure. Sample size accumulates faster, quality usually falls, and the two work against each other. It also means any mistake in your sizing compounds sooner.

    Is a demo account worth using?

    For learning the platform and the mechanics, yes, and it costs nothing. For learning whether you can follow your own rules when money is at stake, no. The pressure is the variable being tested and a demo removes it. Most people benefit from a short demo period followed by very small real positions.

    Do I need to learn indicators at all?

    You need to understand what they are: formulas on past prices, useful as summaries, incapable of adding information that was not already in the chart. One or two understood properly beats twelve half remembered. The mistake is treating the collection as progress.

    What is the single biggest mistake at the start?

    Sizing to the account you hope to have rather than the one you have. It ends the attempt before the learning can happen, and it is the mechanism behind most of the losses in the ESMA figures. Everything else is recoverable.

    Should I take a paid course?

    Some are genuinely useful and some are expensive entertainment, and the honest test is simple: does it tell you what would prove the method wrong. Anything that only shows you winning examples has not taught you a method, it has shown you a highlight reel. Be especially careful with anything that quotes a win rate without a sample size, because as you now know, a win rate without a sample size is not a fact.

    Where Gold Empire fits

    Gold Empire is a free Telegram channel where I post gold analysis with the reasoning stated before the move rather than after it, losing days included. There is nothing to buy in order to follow along, and an optional Kit if you want more structure later. I publish no profit claims, and after reading the section above you will understand why I distrust anyone who does.

    The free survival sheet is the one page version of the constraints in this article.

    About the author. Matthew writes Gold Empire. He is interested in the unglamorous half of this business, cost, size, frequency and the arithmetic of staying solvent, on the view that most accounts are lost to ordinary errors repeated patiently rather than to any single dramatic trade.

    Disclaimer: This article is general educational content about learning to trade and about sample size. It is not financial advice and it is not a recommendation to buy or sell anything. Trading gold, CFDs and leveraged products carries a high risk of losing money rapidly. No entry, stop or target discussed should be treated as a signal. The 55, 52 and 60 percent win rates used above are arbitrary illustrations chosen to demonstrate statistical arithmetic, not targets, forecasts or claims about results. The trading day count is computed from the published LBMA Gold Price PM benchmark for 2016 to 2025, and external figures are linked so you can check them.


  • How to Calculate Lot Size for Gold Forex Trades in One Line

    How to Calculate Lot Size for Gold Forex Trades in One Line

    Most people looking up how to calculate lot size for gold forex trades are hoping for a rule of thumb. Something like “use 0.01 lots per thousand dollars” that they can memorise and stop thinking about. I understand the appeal, and I am not going to give you one, because any rule of that shape is wrong the moment your stop distance changes, which is every trade.

    The good news is that the real calculation is one line of arithmetic and takes about fifteen seconds once you have done it a few times. The part that takes longer is accepting what it implies, which is that your position size is not a decision you get to make. It is an output. Three other numbers decide it for you.

    To be clear from the start: no entry, stop or target discussed should be treated as a signal.

    The three inputs, and why size is not one of them

    Every correct position size comes from exactly three things.

    Your account balance. Simple enough, and the only one of the three that changes slowly.

    The percentage you are willing to risk on this trade. A decision made once, in writing, while calm, not per trade and not by feel. I have written separately about how much to risk per trade, and the number matters far less than the fact that it stays fixed.

    The distance to your stop. This comes from the chart, from wherever your idea is proven wrong. It is not a number you choose for convenience.

    Multiply the first two and you have your risk in dollars. Divide that by the third and you have your size. Notice what is missing: how confident you feel, how good the setup looks, how much you would like to make. None of those appear anywhere in the calculation, and the moment one of them creeps in, you no longer have a risk rule, you have a mood.

    How to calculate lot size for gold forex trades, in one line

    You need one fact about the instrument. A standard lot of XAU/USD is 100 troy ounces, because gold is priced per troy ounce, a convention you can see in the LBMA precious metal price data. That single fact does all the work.

    If one lot is 100 ounces, then a one dollar move in the gold price is 100 dollars of profit or loss per lot. So:

    Lots = risk in dollars, divided by (stop distance in dollars per ounce, times 100).

    Work an example all the way through. A 5,000 dollar account, risking 1 percent, which is 50 dollars. Your stop sits 5 dollars per ounce away. Then lots equals 50 divided by (5 times 100), which is 50 divided by 500, which is 0.10 lots.

    That is the whole method. Now watch what happens when only the stop changes:

    Chart showing how to calculate lot size for gold forex, with the correct lot size falling as the stop distance widens
    How to calculate lot size for gold forex: with risk fixed at 50 dollars, a wider stop means a smaller position, every time.
    • A $3 stop gives 0.167 lots.
    • A $5 stop gives 0.100 lots.
    • An $8 stop gives 0.062 lots.
    • A $12 stop gives 0.042 lots.

    Same account, same risk percentage, same dollar amount at stake. Only the stop moved, and the correct size moved by a factor of four. This is the relationship that trips people up: size and stop distance are inversely proportional, so a wider stop is not more dangerous. A wider stop with unchanged size is more dangerous, and those are completely different statements.

    Rounding, and the small error it introduces

    The formula gives you numbers like 0.062 lots. Your platform will not accept that. Most allow steps of 0.01, so you have to round.

    Always round down. Rounding up means risking more than you decided to, which defeats the purpose of the calculation.

    Rounding down introduces a small, quantifiable shortfall. On a 5,000 dollar account with an 8 dollar stop, the exact answer is 0.062 lots, you trade 0.06, and your real risk becomes 48 dollars rather than 50. That is 4 percent below target. On a 10,000 dollar account with the same stop, 0.125 rounds to 0.12 and you risk 96 rather than 100, again 4 percent light.

    Being 4 percent under your intended risk is harmless. Being 4 percent over, every trade, for a year, is not. That asymmetry is the entire reason the rule is round down rather than round to nearest.

    One thing to watch on smaller accounts: rounding down can take you to the platform minimum, and below a certain balance the minimum itself becomes the binding constraint rather than your arithmetic. I worked through exactly where that line sits in how to trade gold with small account balances, and it is worth reading alongside this if your balance is under about a thousand dollars.

    Four ways this calculation goes wrong

    Using a fixed lot size regardless of stop. The most common error by a distance. Trading 0.10 lots every time means your risk swings with every stop distance, so a trade with a 12 dollar stop risks nearly two and a half times one with a 5 dollar stop. You think you have a consistent risk rule. You have a consistent lot size, which is not the same thing and is considerably worse.

    Choosing the stop to justify the size. The reverse error, and subtler because it feels disciplined. You want a bigger position, so the stop moves closer to entry to make the arithmetic allow it. Now your stop is placed for accounting reasons rather than where your idea fails, and you will be taken out of trades that were working.

    Confusing pips with dollars per ounce. Gold quoting conventions differ between brokers, and a “pip” on gold may be 0.01 or 0.10 or 1.00 depending on the platform. This is where most calculation errors of ten times or a hundred times come from. Working in dollars per ounce, as above, sidesteps the problem entirely. If you prefer to work in pips, confirm what one pip is worth on your account first, and I explain the convention in what a pip in gold trading actually is.

    Forgetting that the account balance changes. One percent of your balance after a losing month is a smaller number than it was before. Recalculating from the current balance is what makes the rule self-correcting, shrinking your size automatically when things go badly. Using the balance you started the year with removes that protection at exactly the moment you need it.

    Check the contract size before you trust the formula

    Everything above assumes a standard lot is 100 troy ounces, which is the common convention. It is not a law, and it is the one input worth verifying rather than assuming.

    Some brokers offer gold in different contract sizes, and a few quote it in a way where one lot is 10 ounces rather than 100. If yours does, every number in this article is out by a factor of ten, which is not a small error when it lands on your position size.

    There is a two minute check that settles it, and it does not require reading any documentation. Open your platform, set up an order for exactly 1.00 lot without placing it, and look at the contract size or notional value the ticket displays. Divide that notional by the current gold price and you have your ounces per lot. If the answer is 100, use the formula as written. If it is 10, replace the 100 in the formula with 10.

    Do the same check whenever you open an account somewhere new, and again if your broker changes its product specifications, which they occasionally do without much fanfare. It is the cheapest possible insurance against the single most expensive category of sizing mistake.

    The same caution applies to any instrument you carry this method across to. The structure of the calculation never changes, risk divided by stop distance times units per lot, but that last term is specific to the contract in front of you.

    Do it before you look at the chart

    A practical suggestion that costs nothing.

    Work out your risk in dollars at the start of the session, before you have an opinion about anything. Write it at the top of the page. Then, when a setup appears, the only number you need from the chart is the stop distance, and the size follows mechanically.

    The reason this ordering matters is that it removes the opportunity to negotiate. If you calculate the risk amount after you have found a setup you like, the number has a way of drifting upward, and the drift never feels like a decision at the time. Calculating it while you have no position and no opinion is the cheapest discipline available in this whole business, and it is the same reasoning that sits underneath the risk management approach and position sizing for gold more broadly.

    Frequently asked questions

    What is the formula for lot size in gold trading?

    Lots equals your risk in dollars divided by the stop distance in dollars per ounce multiplied by 100. The 100 comes from a standard XAU/USD lot being 100 troy ounces, so a one dollar move is 100 dollars per lot. Risking 50 dollars with a 5 dollar stop gives 0.10 lots.

    How many lots should I trade with a $1,000 account?

    There is no single answer, because it depends entirely on your stop distance. Risking 1 percent of 1,000 dollars is 10 dollars, which gives 0.033 lots on a 3 dollar stop but only 0.008 lots on a 12 dollar stop. Any advice that quotes a lot size without asking about your stop is guessing.

    Should I round lot size up or down?

    Down, always. Rounding up means exceeding the risk you decided on, while rounding down leaves you slightly under. On a 5,000 dollar account with an 8 dollar stop, rounding 0.062 to 0.06 puts your real risk at 48 dollars instead of 50, about 4 percent light, which is harmless in a way that being 4 percent heavy is not.

    Does lot size change if I use more leverage?

    No. Leverage determines the margin your broker holds while the position is open, not what you lose if the stop is hit. Your loss is size multiplied by stop distance, and leverage appears nowhere in that calculation. Higher leverage only permits larger positions, it does not make them appropriate.

    Why is my risk different from what I calculated?

    Usually one of three things: rounding, a pip convention that differs from what you assumed, or slippage. Stop orders become market orders when triggered, so in fast conditions you may be filled worse than your level, making the real loss larger than the arithmetic suggested. Treat the calculated figure as your intended risk rather than a guaranteed maximum.

    Can I use a lot size calculator instead?

    Yes, and most are fine, but check what it assumes about contract size and pip value before trusting it. A calculator built for currency pairs will give you a badly wrong answer on gold. Running one example by hand against the formula above takes a minute and tells you whether the tool is doing the right thing.

    Where this leaves you, and what we do about it

    The honest summary is that position size is arithmetic dressed up as a decision. Three inputs go in, one number comes out, and the only judgement involved is where the stop belongs. Once you work it in this order, the daily question stops being how much should I trade and becomes where is this idea proven wrong, which is a far better question to be asking.

    Gold Empire is a free Telegram channel where we work through market context in public, including the days the read does not work out. There is no promise of profit, because there honestly cannot be one. What there is, is a group of people trying to stay in the game long enough for competence to start paying.

    If this was useful, the free Gold Survival Sheet is the natural next step. It is a one page checklist that puts the size, the cost and the ceiling in front of you before you enter, and it is free to download with nothing to join.

    About the author. Matthew writes the Gold Empire market notes. He spends most of his time on the unglamorous half of trading, position size, dealing costs and the arithmetic of recovery, on the view that surviving the first two years is what makes the rest of it possible.

    Disclaimer: This article is general educational content about how leveraged markets work. It is not financial advice and it is not a recommendation to buy or sell anything. Trading leveraged products carries a high risk of losing money rapidly. No entry, stop or target discussed should be treated as a signal. Figures attributed to external sources are linked so you can check them, and figures I have calculated are shown with the assumptions they rest on so you can change them.